Custom Connector Lab 1
Task: Create a Custom Connector to retrieve the data from an external system (in this case it is an SQL Database) and save it in the Account table of the EmpowerID database.
Prepare the External System for this Lab
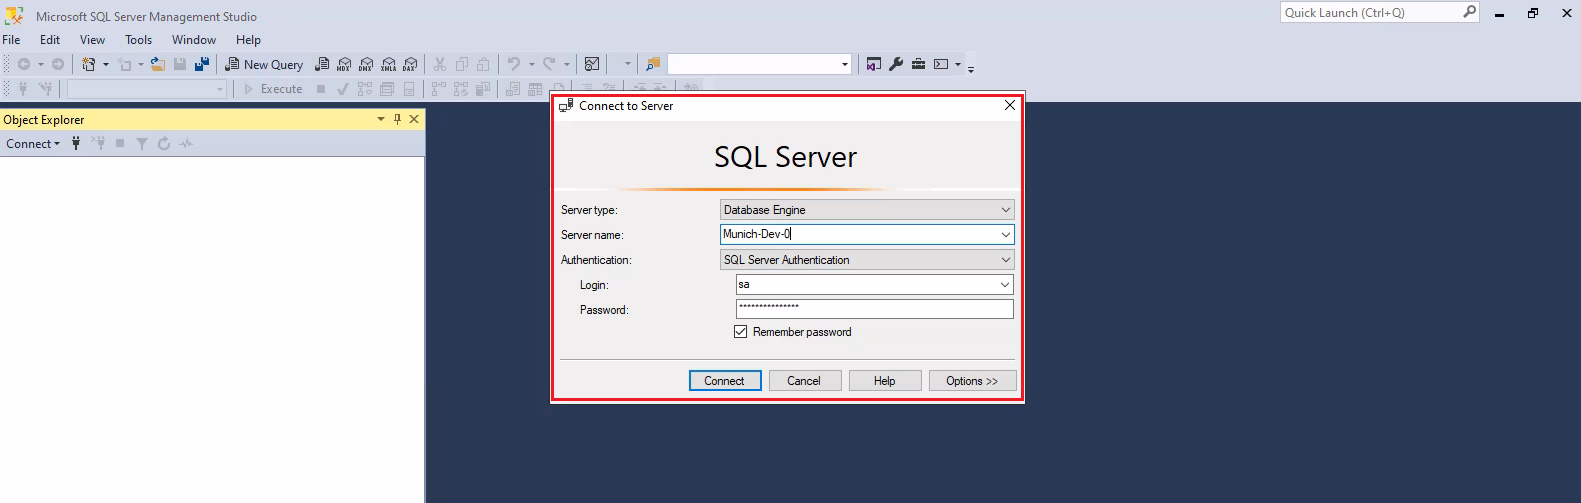
- Log in to the SQL server on your machine. (Provide the Server name, Login, and Password given to you by your IT department or SysOps.)
-
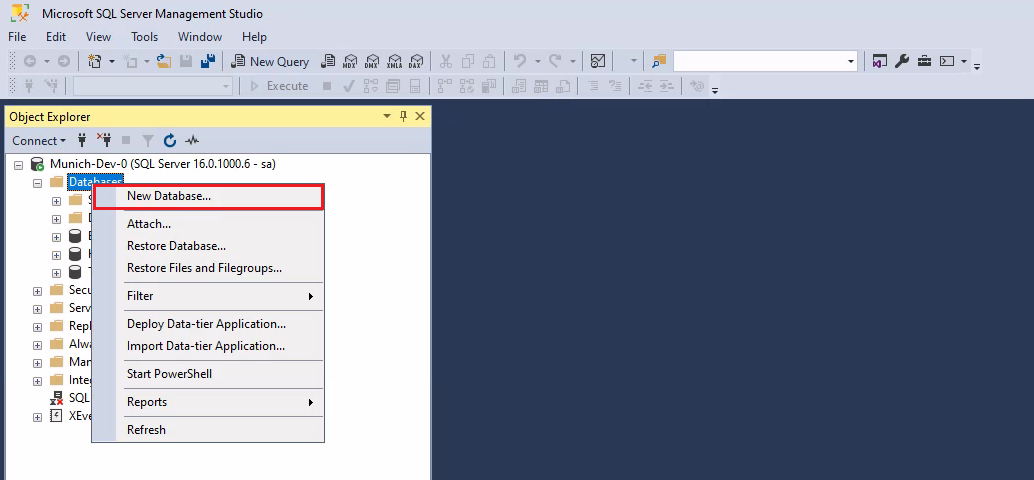
Create a database and give it a name; in our case, I will name it ExternalDB.
-
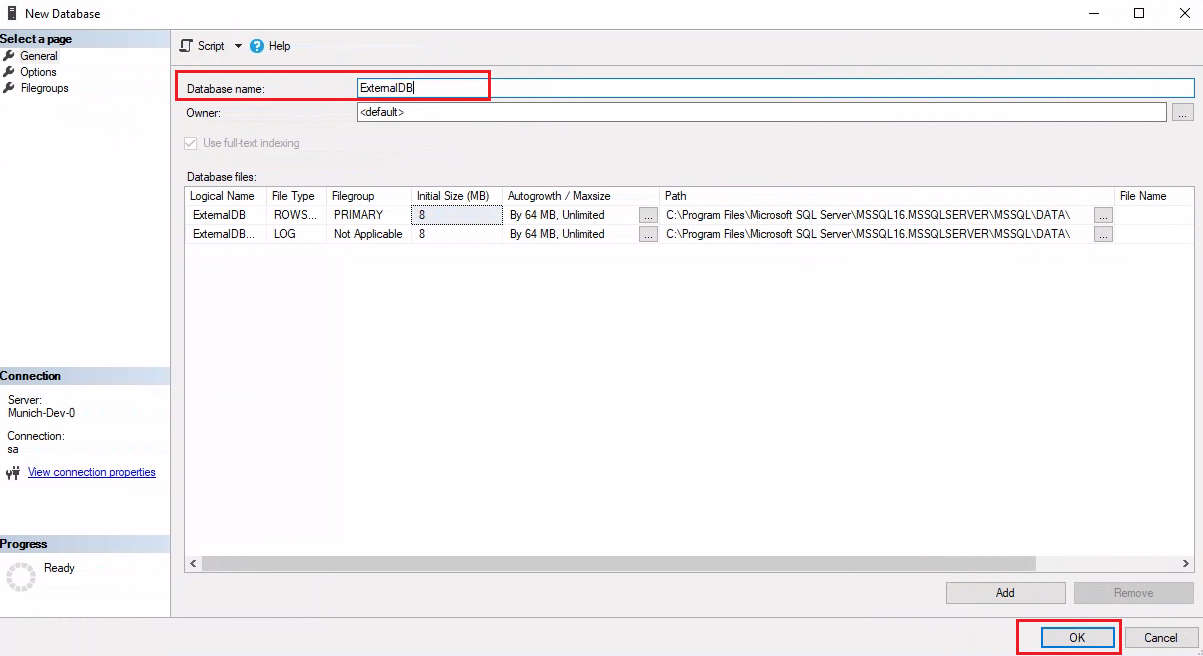
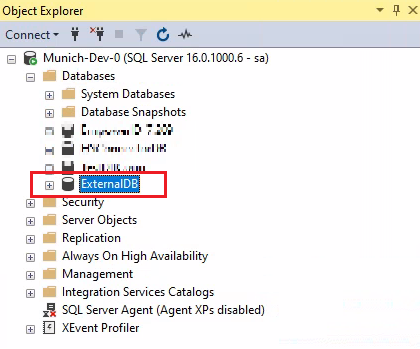
Right-click on the Databases folder and from the menu, click on New Database. The New Database dialog box will appear. In the Database name: textbox, type ExternalDB and click on the OK button.
-
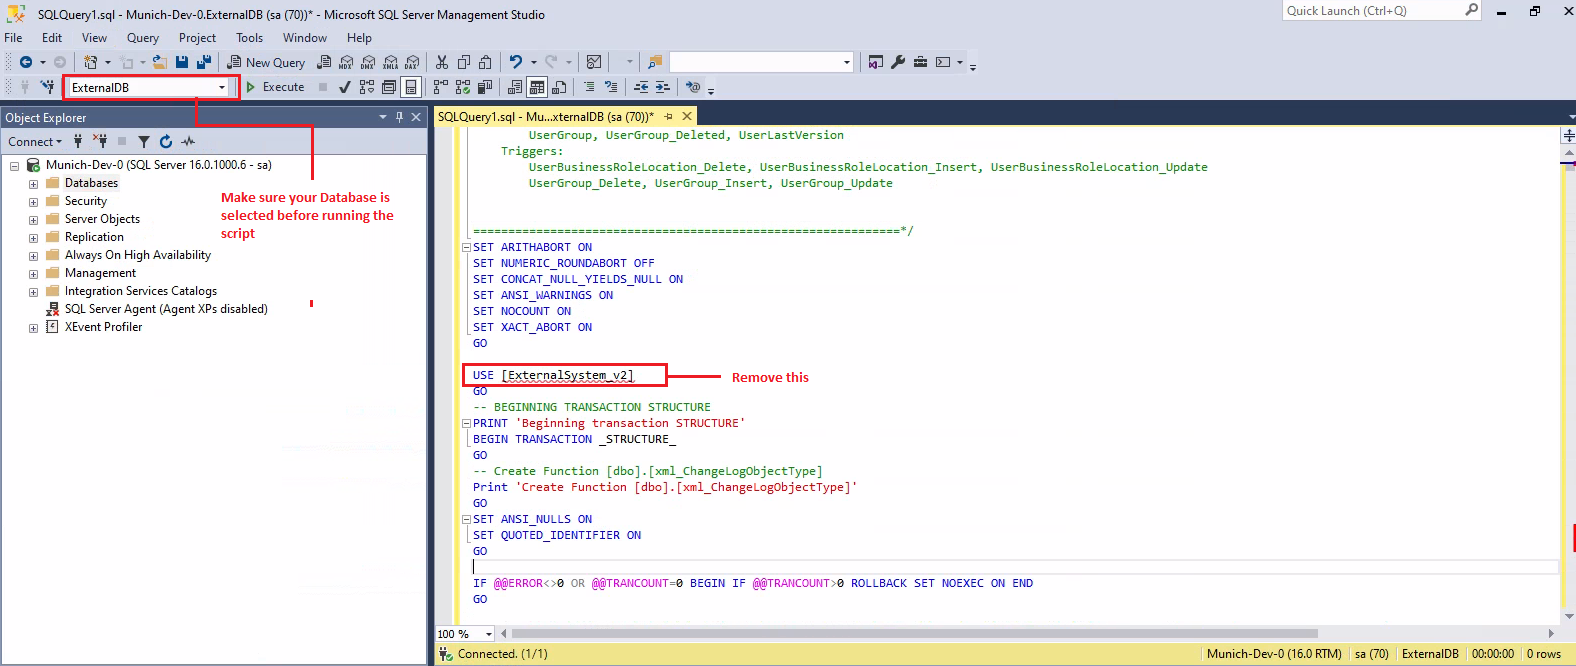
Once the database is created, run the UCv2SchemaGenerationScript. Make sure to remove the USE [Database_Name] statement from it before running the script.
UCv2SchemaGenerationScript.zip
SchemaGeneration.sql — This script generates the tables, stored procedures and other database objects used by EmpowerID to store and maintain the identity information imported into the intermediary database from an external data store.
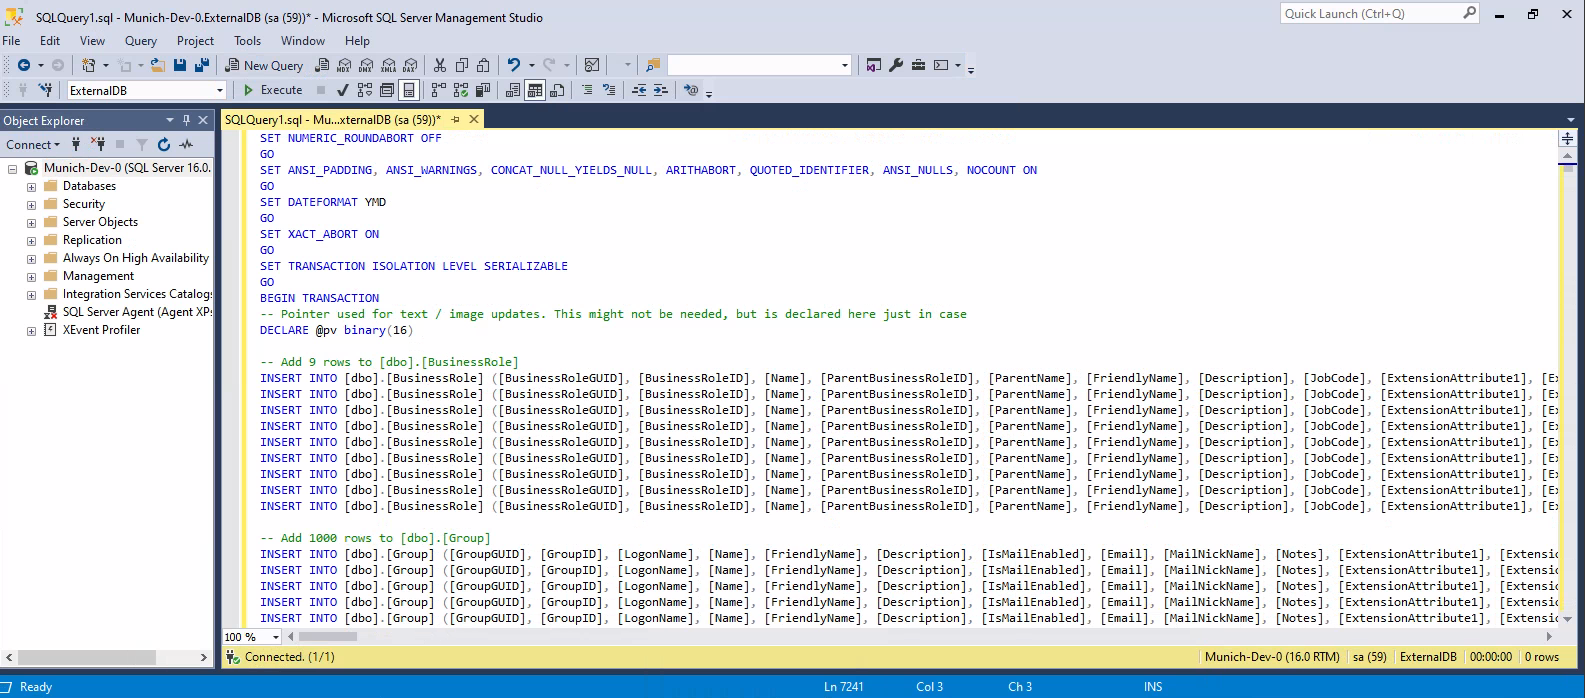
- Until now, we have created a database named ExternalDB and have also created stored procedures, tables, and other database objects in it. Now, it’s time to populate it with data. Run the SampleData script to generate data for our database. SampleData.sql
Create Custom Connector
-
Log in to Workflow Studio.
-
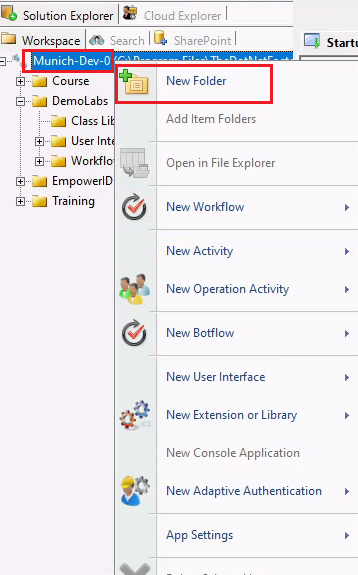
In the Workspace, right-click on the root folder, create a new folder called “DemoLabs” and click the Ok button.

-
Add New Folder dialog box will appear from it; select the following options.
- User Interface > Lookup Control
- User Interface > Forms
- User Interface > Class Libraries
- Workflows > Applications
- Workflows > Activities
And click the Ok button.

-
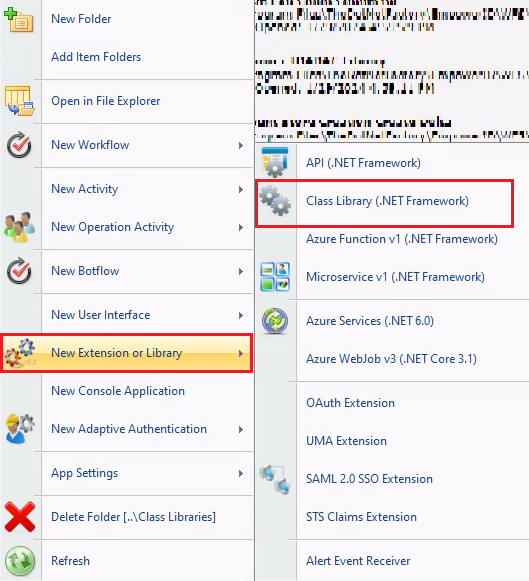
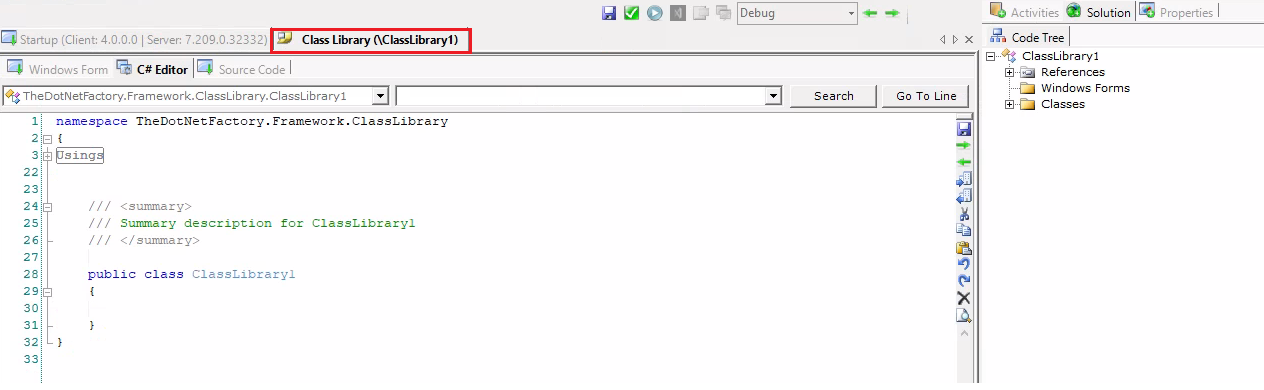
Expand the DemoLabs folder, under the DemoLabs folder, right click on the Class Libraries. Go to New Extension or Library → Class Library (.NET Framework) and click on it.
Don't save it now, as we have been doing for our Forms, Lookups, UI Pages, Activities
- Go to the Properties tab, expand the Build section, click on the Supports textbox, and then click on the three dots.
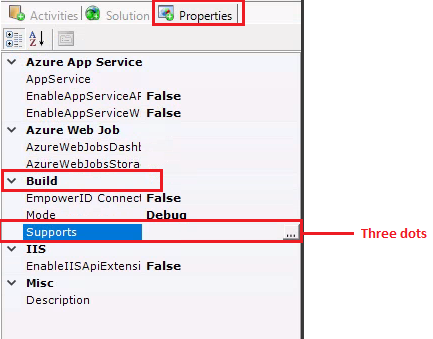
-
The Supported Type dialog box will appear. From it, select the Connector and click on the OK button.
Click on Class Library (.NET Framework)
This class will be created.
Don’t save it now, as we have been doing for our forms, lookups, UI pages, and activities.

-
Go to the Solution tab and right-click on the Classes folder. Go to Add New Implementation → Add New Connector Implementation and click on it.
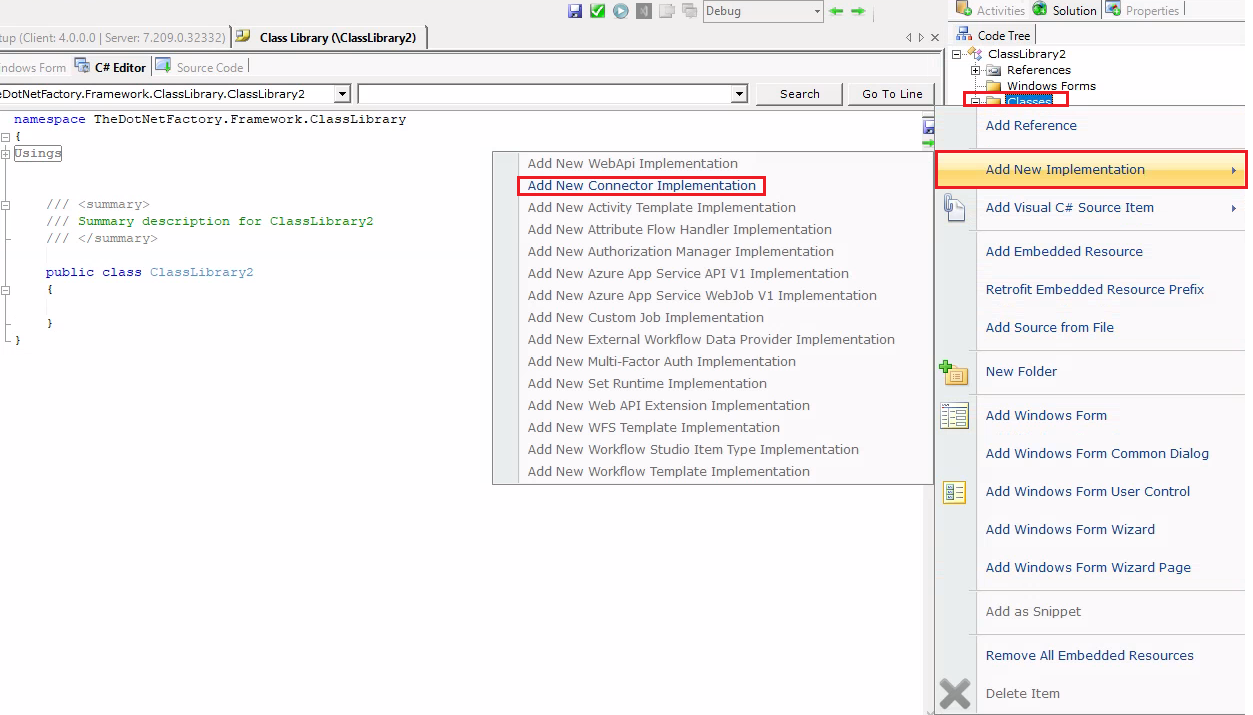
If you did not select the Connector option in the Supports textbox in the previous step, then the Add New Connector Implementation option would be disabled here.
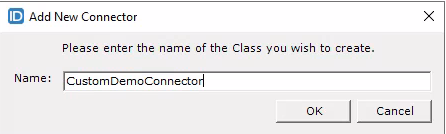
- In the Add New Connector dialog box, enter the name of your class, for example, CustomDemoConnector, and click on the OK button.
This class is going to have Inventory method.
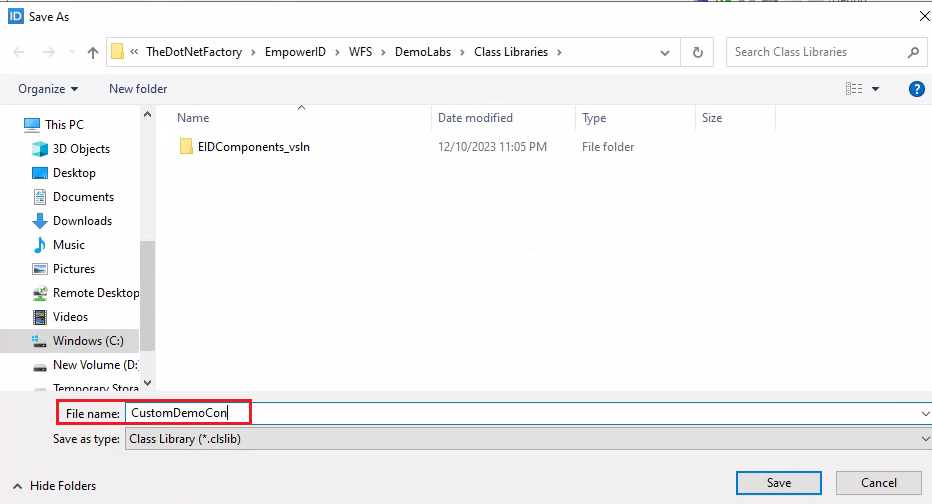
- Now click on the Save button and in the File Name field, enter a name, for example, CustomDemoCon.

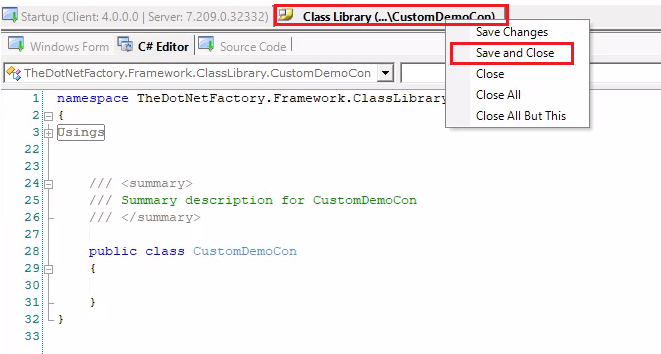
- Right-click on the Class Library (…\CustomDemoCon) and click on the Save and Close option.
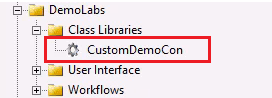
- Double-click on CustomDemoCon under your Class Libraries folder, and it will open the project in Visual Studio. This is where we will write our code. We don’t write any code in our Workflow Studio for connectors.
- Once you are inside Visual Studio, open CustomDemoConnector.cs, and there you will be able to see the Inventory method.
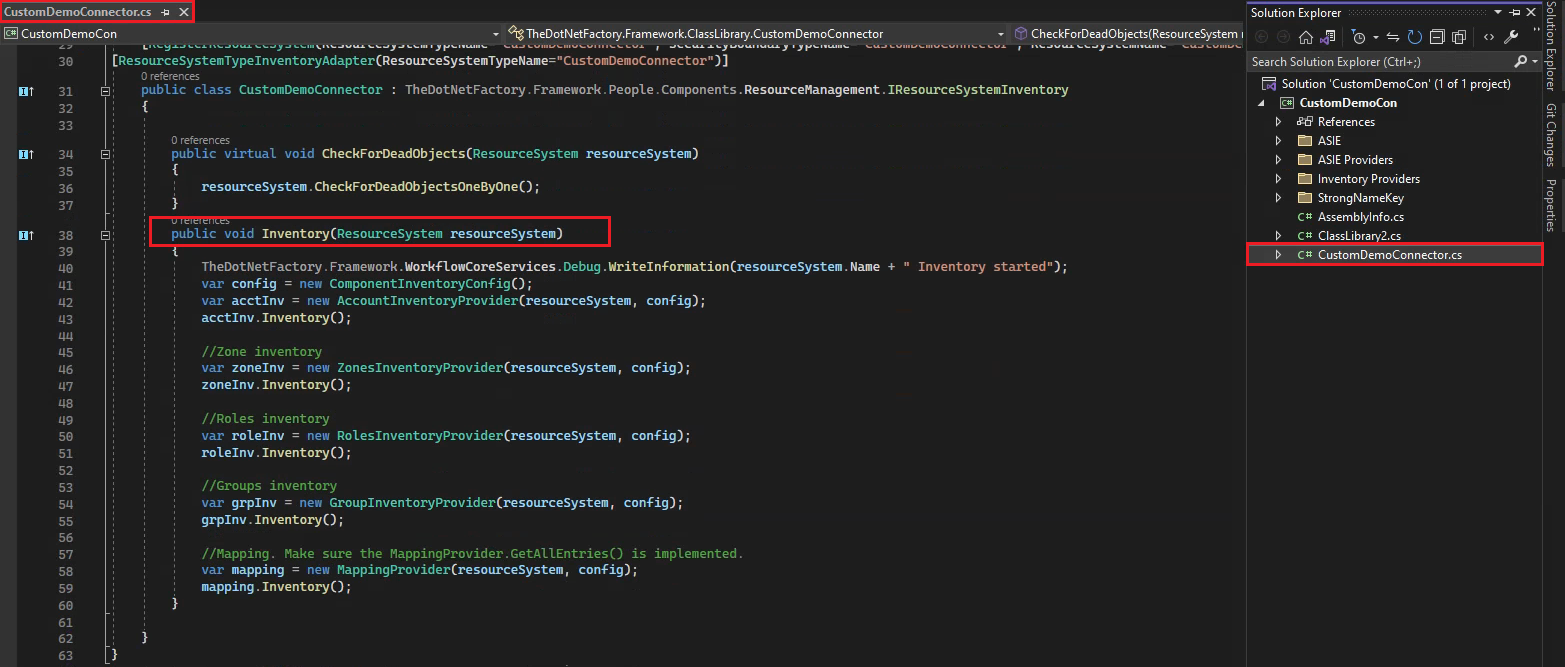
We have talked about the Inventory method in the theory part of this lesson.
- Comment out the code for Zone inventory, Roles inventory, Groups inventory, and Mapping because, in this demonstration, we are only interested in account inventory. Therefore, we will inventory only accounts. Save your changes.

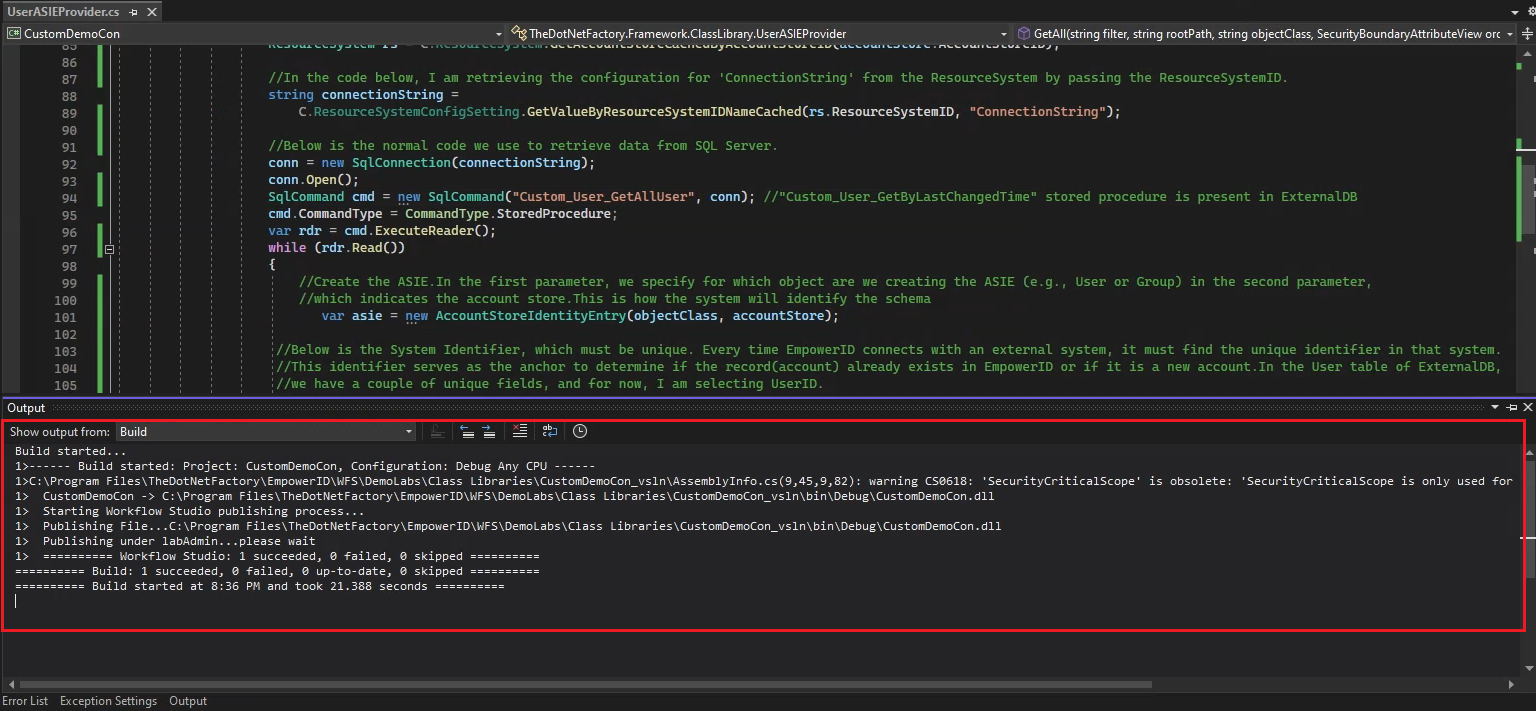
- Now go to the Solution Explorer under the ASIE Providers folder double click on the UserASIEProvider.cs.
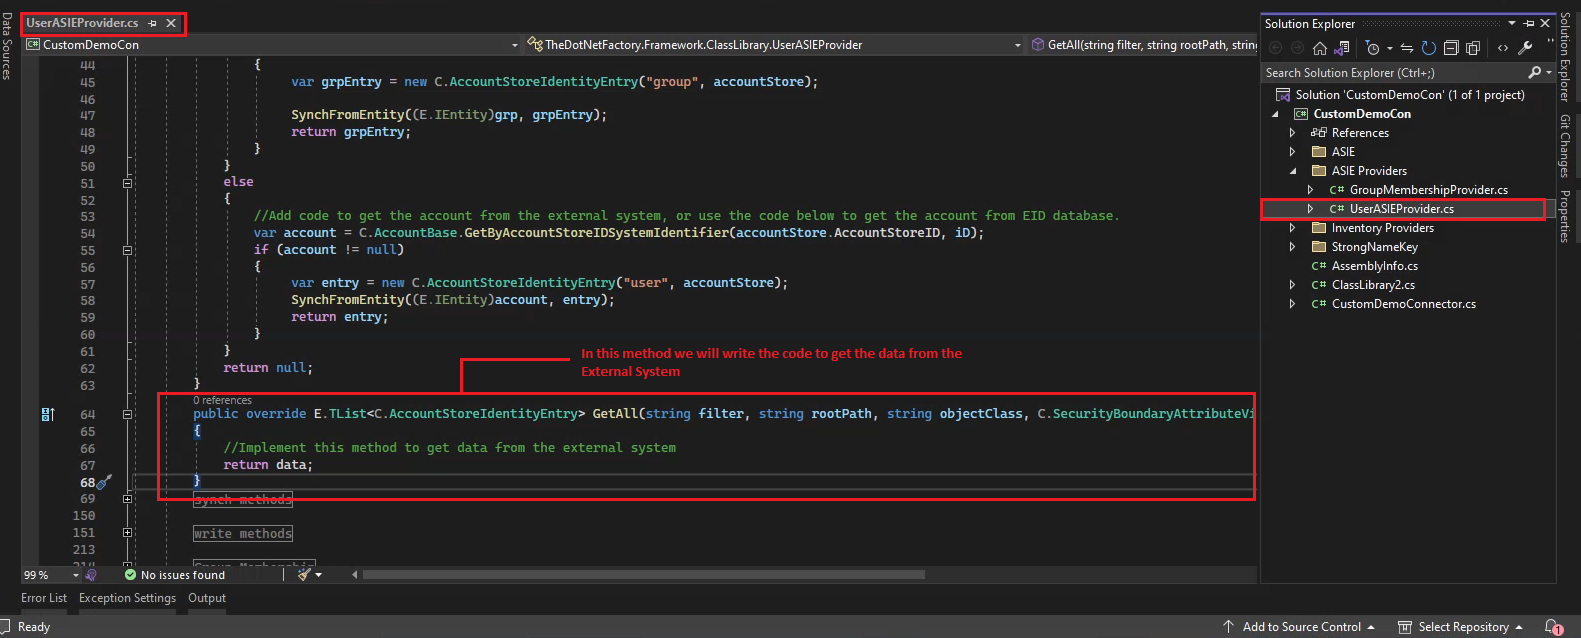
-
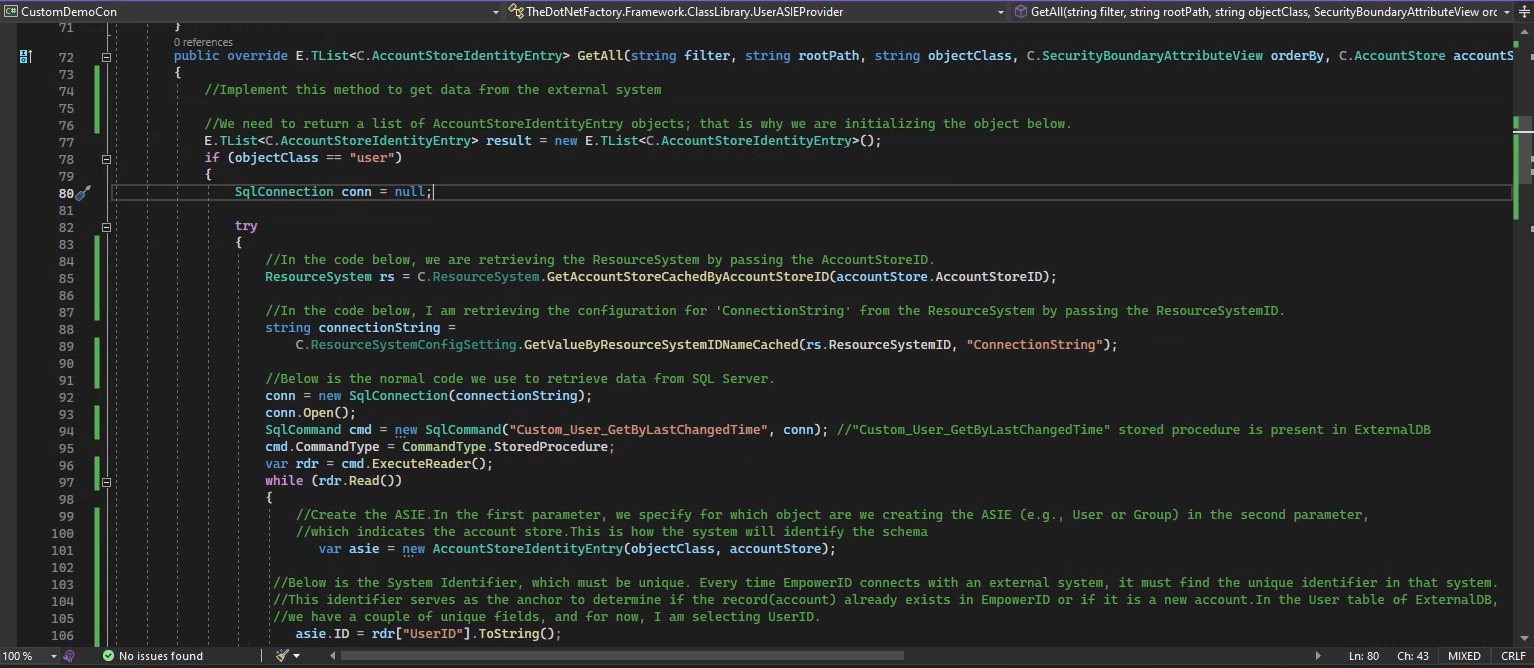
Write the following code in the GetAll method of the UserASIEProvider class. Additionally, add the following 'using' statements in addition to those that are already present in the class.
using System.Data.SqlClient;
using System.Data;
//Implement this method to get data from the external system
//We need to return a list of AccountStoreIdentityEntry objects; that is why we are initializing the object below.
E.TList<C.AccountStoreIdentityEntry> result = new E.TList<C.AccountStoreIdentityEntry>();
if (objectClass == "user")
{
SqlConnection conn = null;
try
{
//In the code below, we are retrieving the ResourceSystem by passing the AccountStoreID.
ResourceSystem rs = C.ResourceSystem.GetAccountStoreCachedByAccountStoreID(accountStore.AccountStoreID);
//In the code below, I am retrieving the configuration for 'ConnectionString' from the ResourceSystem by passing the ResourceSystemID.
string connectionString =
C.ResourceSystemConfigSetting.GetValueByResourceSystemIDNameCached(rs.ResourceSystemID, "ConnectionString");
//Below is the normal code we use to retrieve data from SQL Server.
conn = new SqlConnection(connectionString);
conn.Open();
SqlCommand cmd = new SqlCommand("Custom_User_GetAllUser", conn); //"Custom_User_GetByLastChangedTime" stored procedure is present in ExternalDB
cmd.CommandType = CommandType.StoredProcedure;
var rdr = cmd.ExecuteReader();
while (rdr.Read())
{
//Create the ASIE.In the first parameter, we specify for which object are we creating the ASIE (e.g., User or Group) in the second parameter,
//which indicates the account store.This is how the system will identify the schema
var asie = new AccountStoreIdentityEntry(objectClass, accountStore);
//Below is the System Identifier, which must be unique. Every time EmpowerID connects with an external system, it must find the unique identifier in that system.
//This identifier serves as the anchor to determine if the record(account) already exists in EmpowerID or if it is a new account.In the User table of ExternalDB,
//we have a couple of unique fields, and for now, I am selecting UserID.
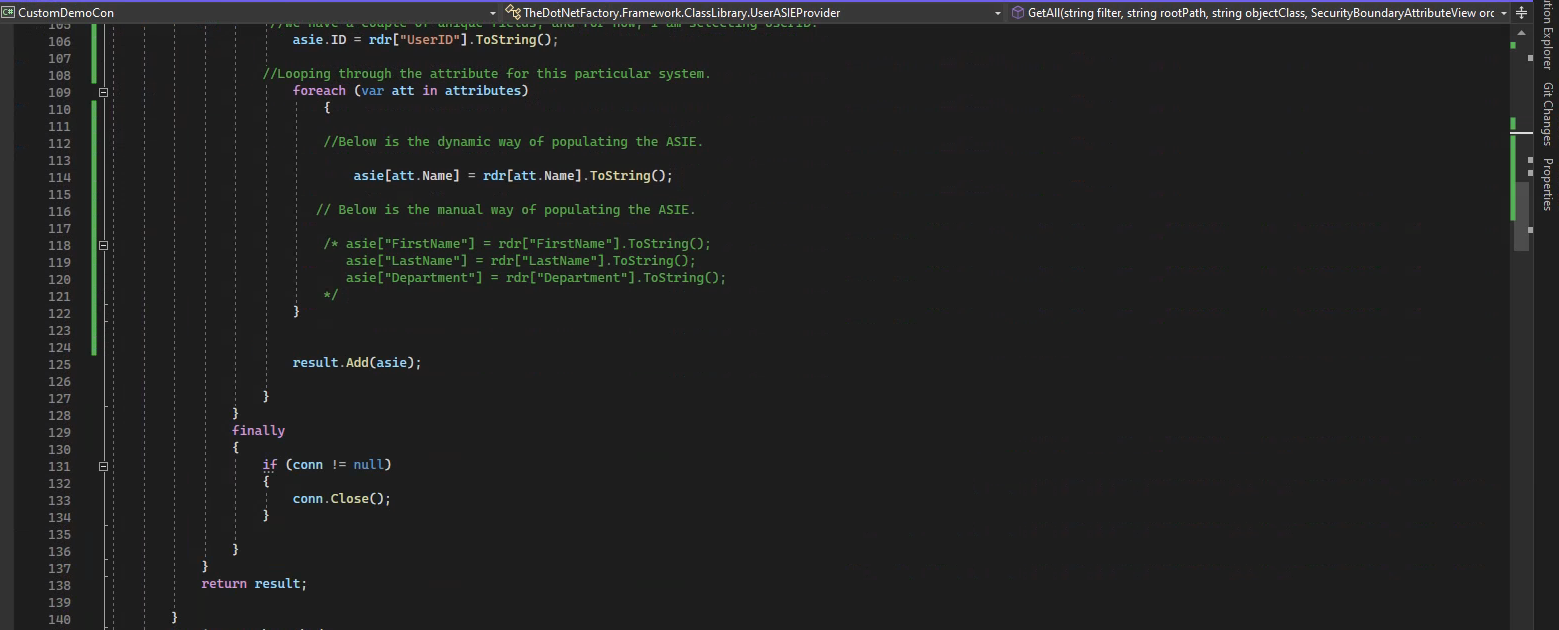
asie.ID = rdr["UserID"].ToString();
//Looping through the attribute for this particular system.
foreach (var att in attributes)
{
//Below is the dynamic way of populating the ASIE.
asie[att.Name] = rdr[att.Name].ToString();
// Below is the manual way of populating the ASIE.
/* asie["FirstName"] = rdr["FirstName"].ToString();
asie["LastName"] = rdr["LastName"].ToString();
asie["Department"] = rdr["Department"].ToString();
*/
}
result.Add(asie);
}
}
finally
{
if (conn != null)
{
conn.Close();
}
}
}
return result;
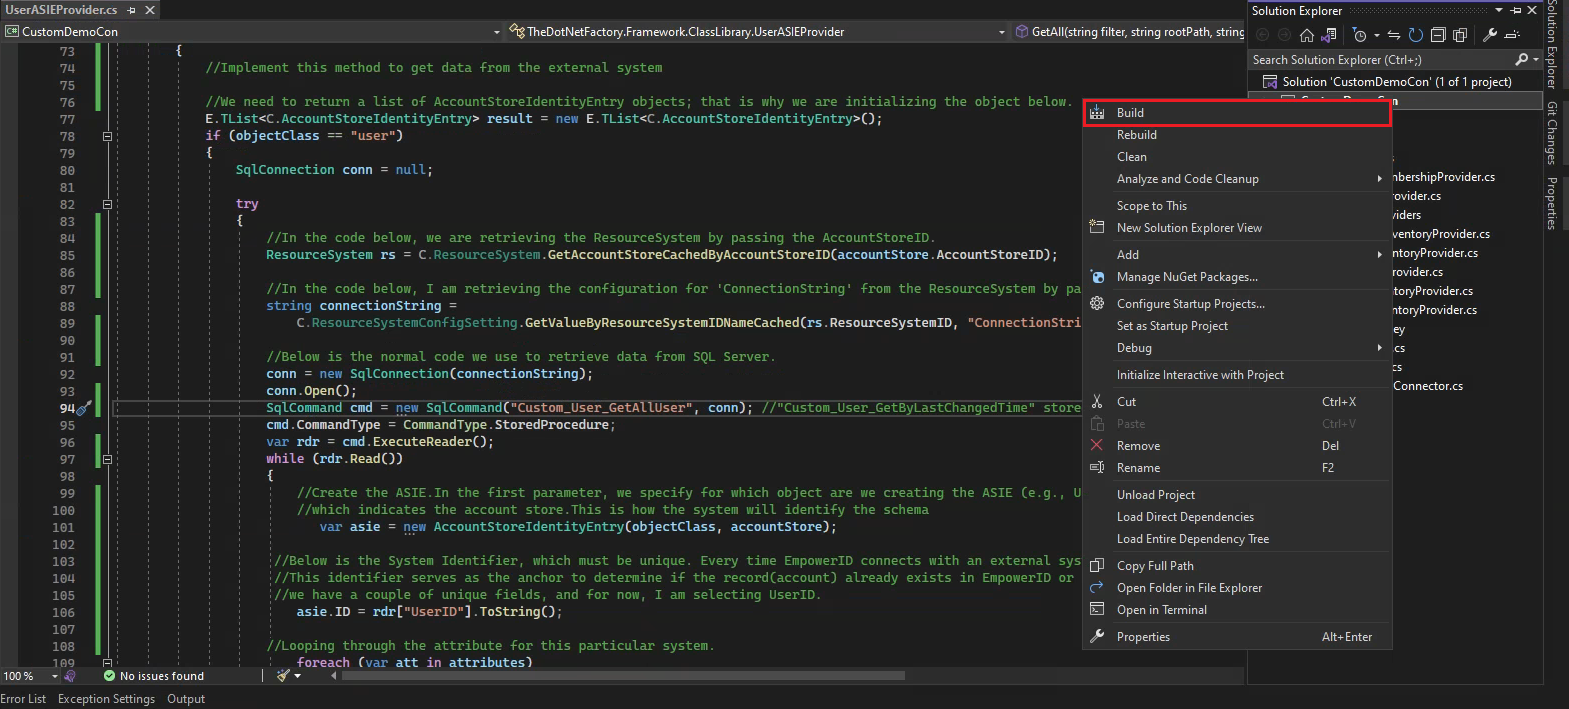
- Build the connector. Right click on the Project and click on the Build option. It will publish our connector.
- Publish the connecor in the EmpowerID UI and reset the IIS.
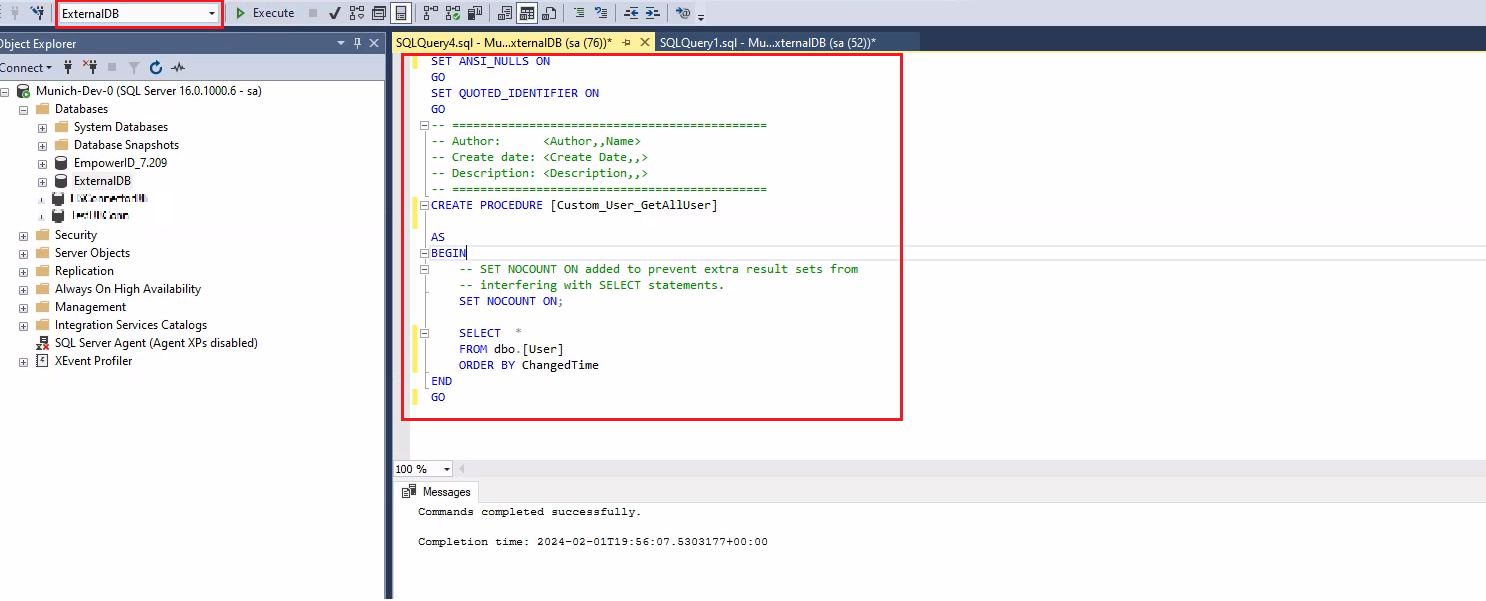
Stored Procedure in External
-
Create a stored procedure in ExternalDB and name it Custom_User_GetAllUser
SET ANSI_NULLS ON
GO
SET QUOTED_IDENTIFIER ON
GO
-- =============================================
-- Author: <Author,,Name>
-- Create date: <Create Date,,>
-- Description: <Description,,>
-- =============================================
CREATE PROCEDURE [Custom_User_GetAllUser]
AS
BEGIN
    -- SET NOCOUNT ON added to prevent extra result sets from
    -- interfering with SELECT statements.
    SET NOCOUNT ON;

    SELECT  *
    FROM dbo.[User]
    ORDER BY ChangedTime
END
GO
From here onwards, I will use different names for the Security Boundary Type and Resource System Type so that you can distinguish between them. However, you would give the same name to both. For example, the name for both your Security Boundary Type and Resource System Type would be 'AlphaTest.' instead of AlphaSecurityBoundaryType and AlphaResourceSystemType
Resource System Types
- Create resource system type by going to the Infrastructure Admin → Type Definitions → Resource System Types and click on the + button.
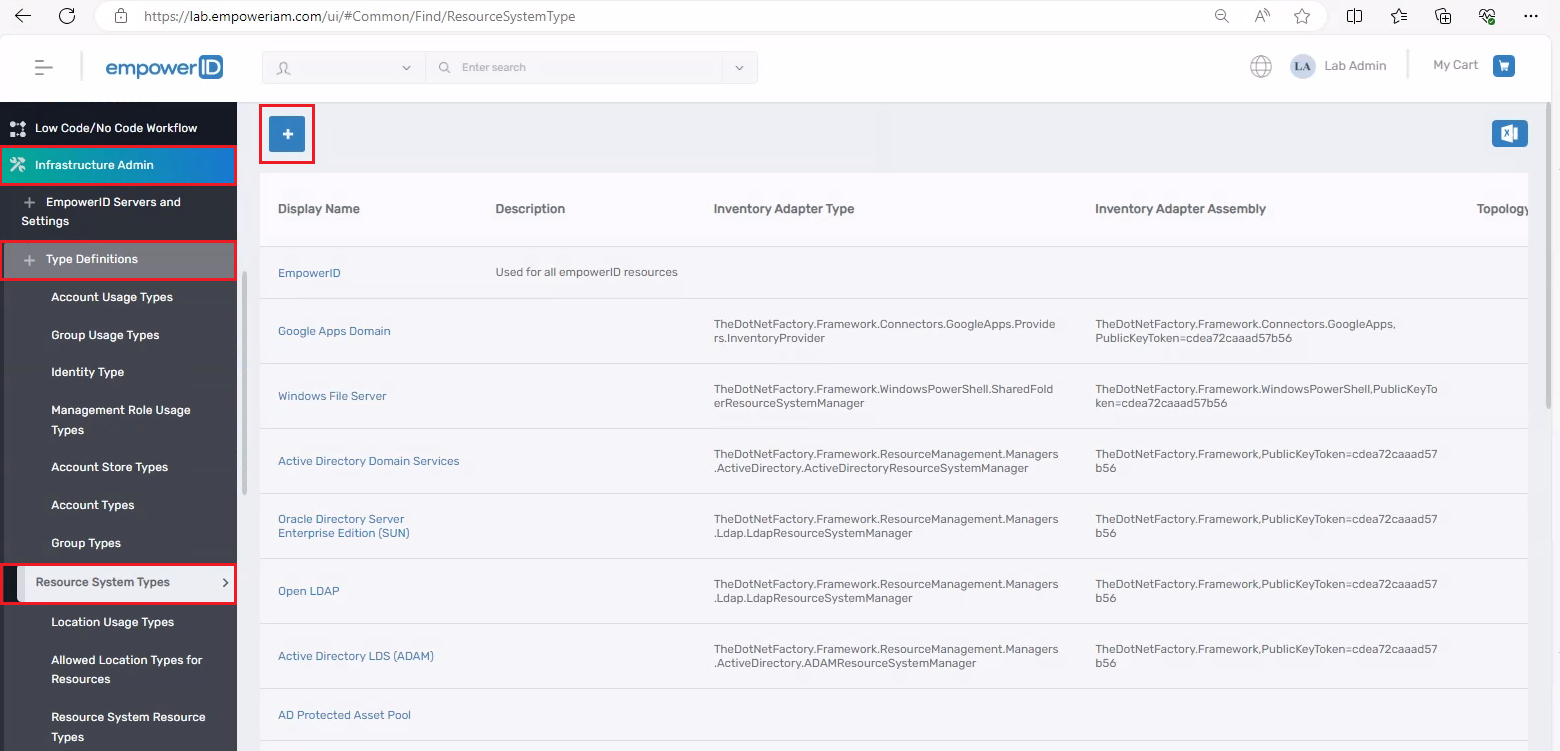
- Fill out the Resource System Type Details as below:
- Name: AlphaResourceSystemType
- Display Name: AlphaResourceSystemType
- Inventory Adapter Type: TheDotNetFactory.Framework.ClassLibrary.CustomDemoConnector
- Inventory Adapter Assembly: CustomDemoCon, Version=4.0.180.1, Culture=neutral, PublicKeyToken=2d2253f74d4496ef
Inventory Adapter Type: Here you need to provide the class name which implements the IResourceSystemInventory in our case it is the CustomDemoConnector class. Provide the fully qualified name here.
Inventory Adapter Assembly: Use this assembly when calling Inventory methods.
In the above configuration, we are indicating that when we want to call the inventory, the methods should use this assembly ('CustomDemoCon, Version=4.0.180.1, Culture=neutral, PublicKeyToken=2d2253f74d4496ef'), create an instance of this class ('TheDotNetFactory.Framework.ClassLibrary.CustomDemoConnector'), and then call dot Inventory.
Security Boundry Type
- Create security boundary type by going to the Infrastructure Admin → Type Definitions → Security Boundary Types and click on the + button.
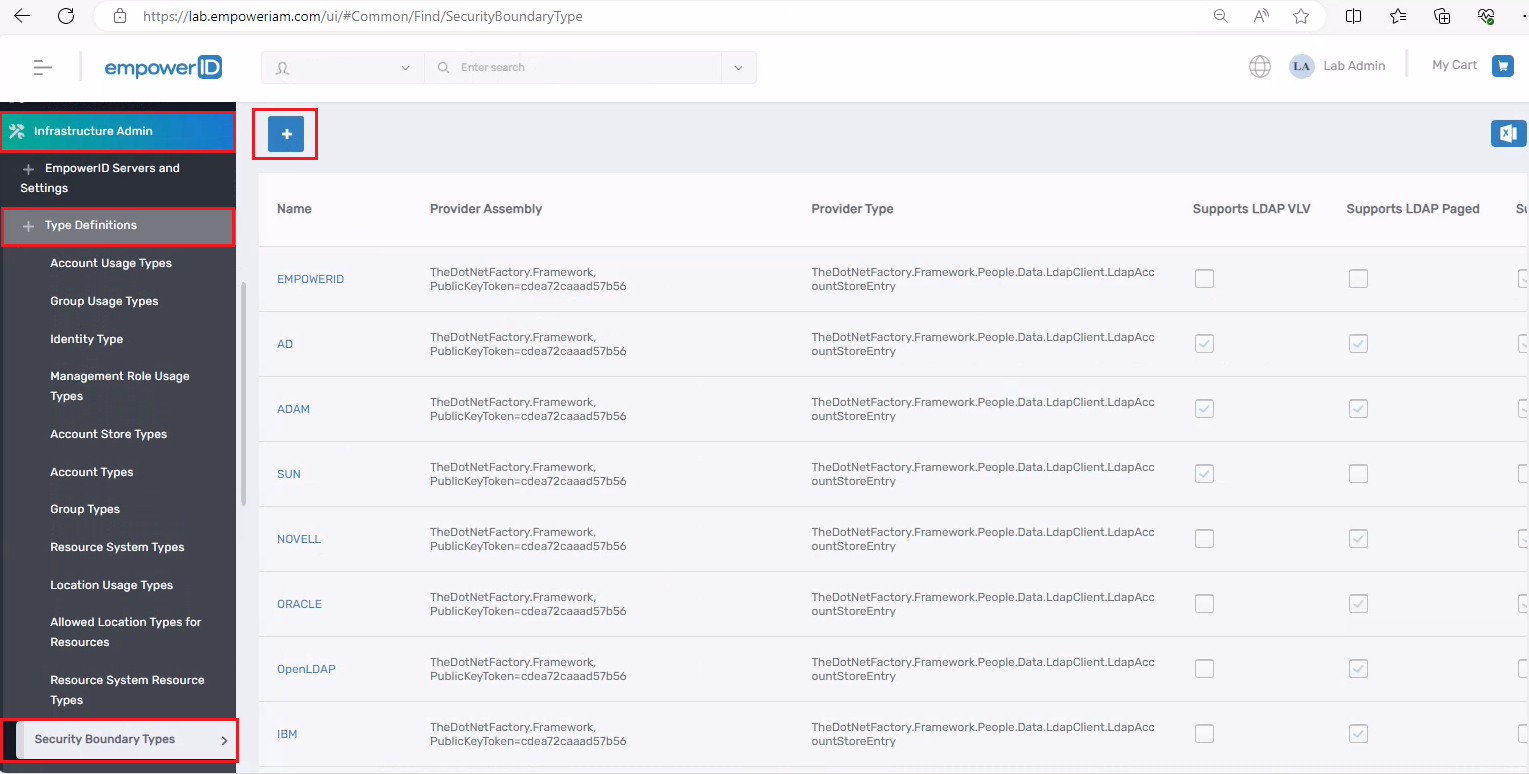
- Fill out the Security Boundary Type Details as below:
- Name: AlphaSecurityBoundaryType
- Display Name: AlphaSecurityBoundaryType
- Provider Assembly: CustomDemoCon, Version=4.0.180.1, Culture=neutral, PublicKeyToken=2d2253f74d4496ef
- Provider Type: TheDotNetFactory.Framework.ClassLibrary.UserASIEProvider
Click on the Save button.
- Provider Assembly: To communicate with the system, use this assembly.
- Provider Type: This is the class that implements the AccountStoreIdentityEntry. Provide the fully qualified name here.
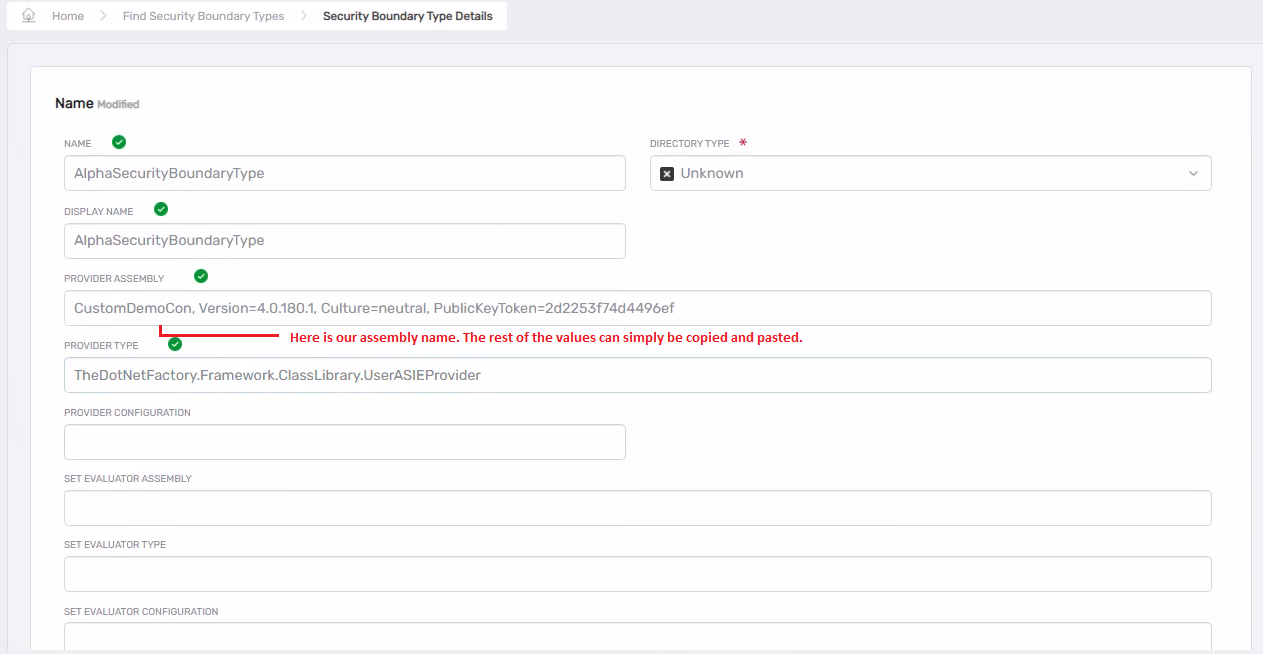
Also, tick the ShowInCreateNewList checkbox; otherwise, the Security Boundary Type may not appear in the CreateAccountStore workflow.

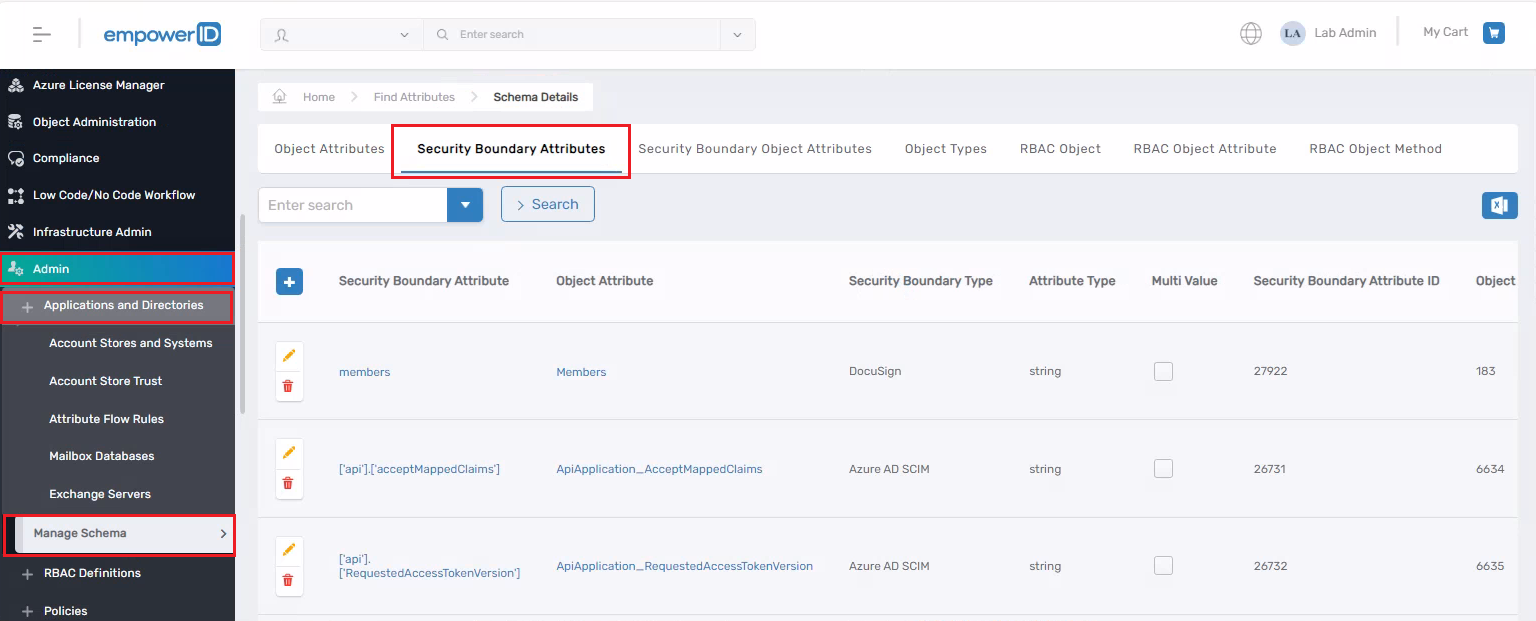
Manage Schema
We already explained this in the theory part of the Custom Connector.
Security Boundary Attributes
-
Create security boundary attributes by going to the Admin → Applications and Directories → Manage Schema
-
Go to the Security Boundary Attributes tab and click on the + button.
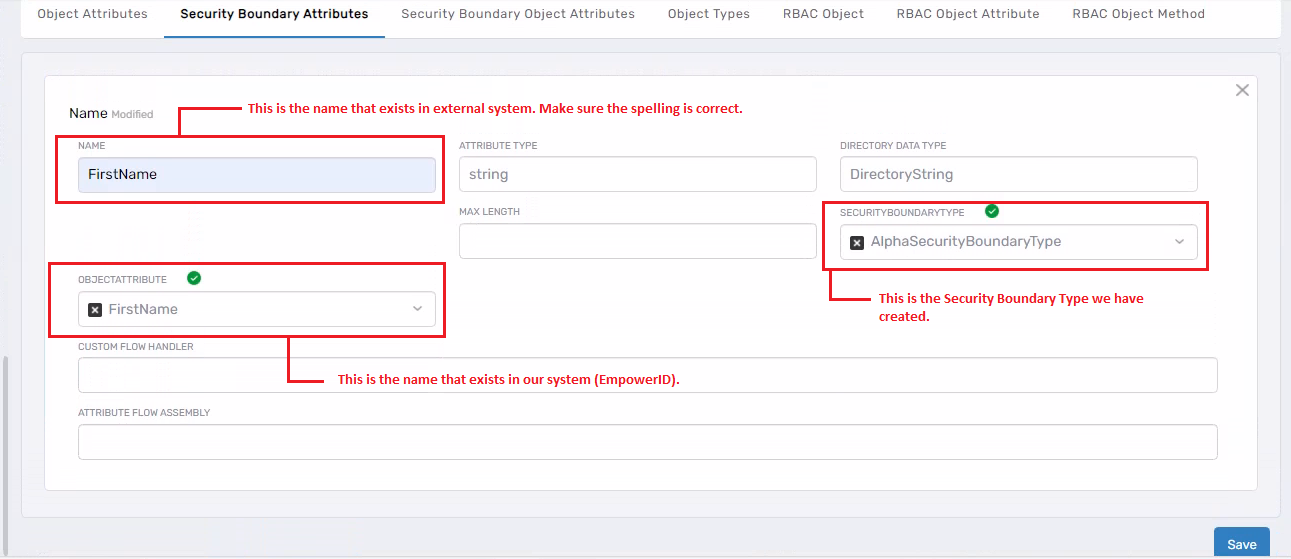
- Fill out the form fields as shown below.
- Name: FirstName
- Attribute Type: string
- Directory Data Type: DirectoryString
- SecurityBoundaryType: AlphaSecurityBoundaryType
- ObjectAttribute: FirstName
Click on the Save button.
- Repeat the step 30 for these fields as well.
| Name | Attribute Type | Directory Data Type | Security Boundary Type | Object Attribute | Action |
|---|---|---|---|---|---|
| LastName | string | DirectoryString | AlphaSecurityBoundaryType | LastName | Click on the Save button |
| string | DirectoryString | AlphaSecurityBoundaryType | Click on the Save button | ||
| EmployeeID | string | DirectoryString | AlphaSecurityBoundaryType | EmployeeID | Click on the Save button |
| LogonName | string | DirectoryString | AlphaSecurityBoundaryType | LogonName | Click on the Save button |
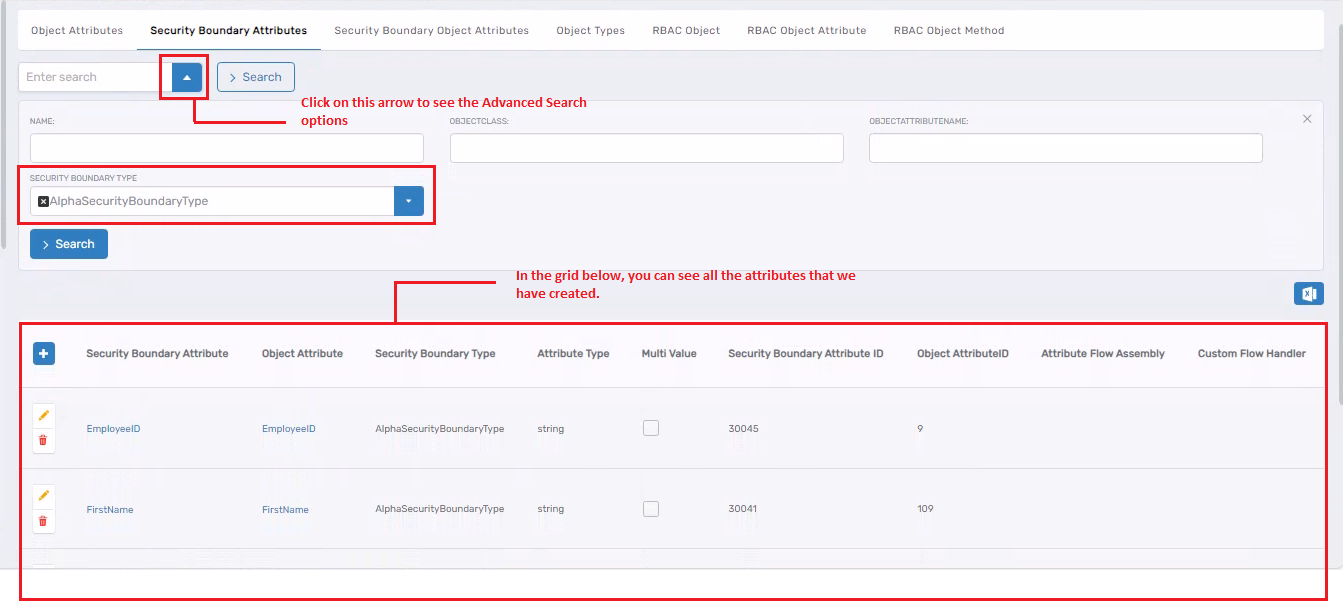
- While in the Security Boundary Attributes tab, click on the small drop-down arrow next to the search textbox. Then, in the security boundary type dropdown, select AlphaSecurityBoundaryType. Hit Search button. This action will list all the Attributes that we have just created.
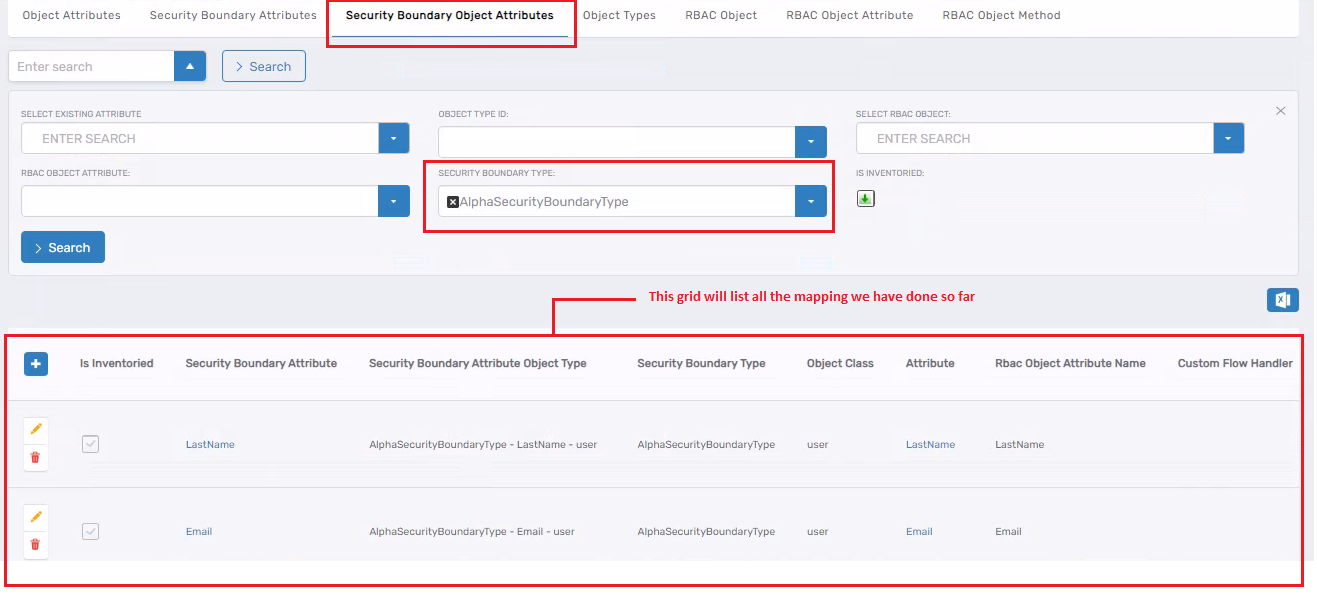
Security Boundary Object Attributes
Up until now, we have only added the security boundary attributes, but we haven’t specified whether this attribute is for the user, the group, a location, or any other object, so we need to specify it. Here, we will perform the mapping of the attribute to the RBAC object.
- Go to the Security Boundary Object Attributes tab and click on the + button.
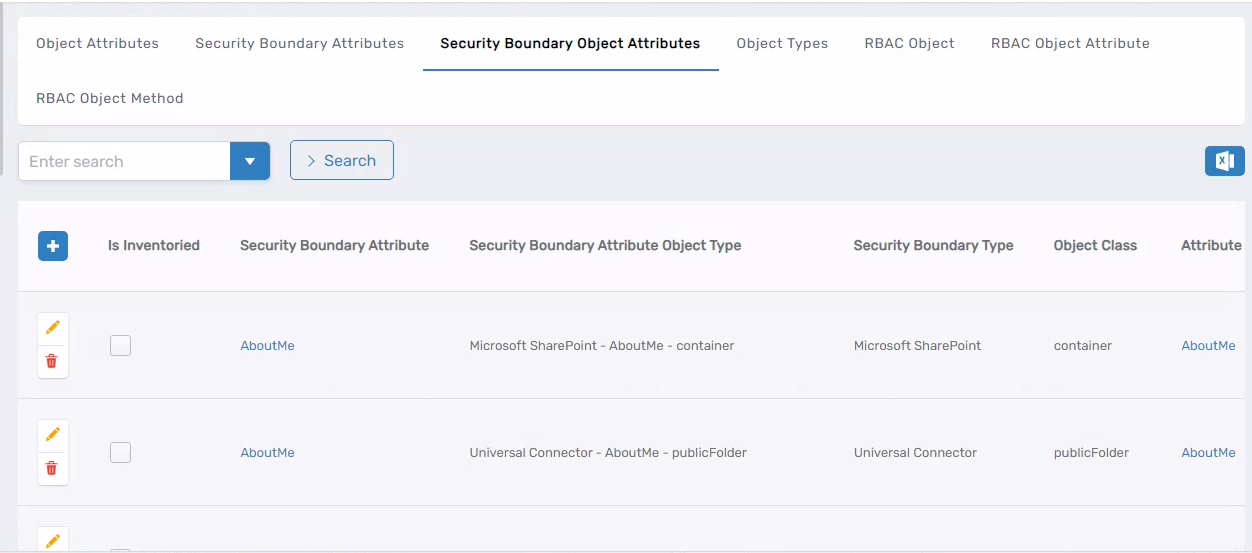
- Fill out the form fields as shown below.
- Select Existing Attribute: FirstName
- Object Type: user: user
- Select RBAC Object: Account
- RBACOBJECT Attribute: FirstName
- Is Inventoried: Checkmark
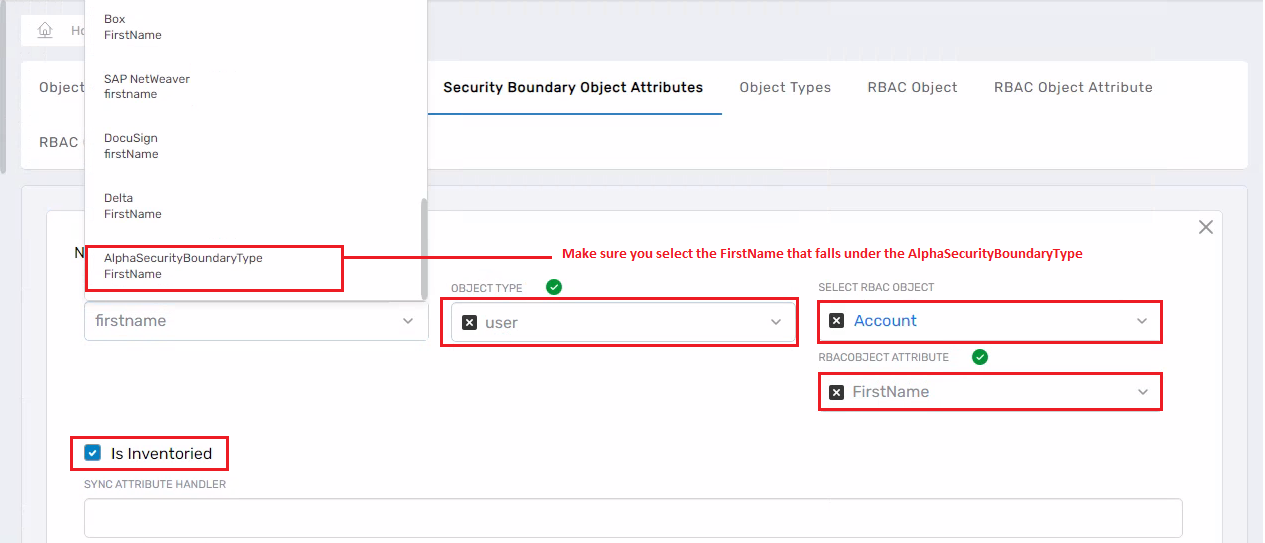
The term "Is Inventoried" refers to the process of integrating data into EmpowerID. When an attribute is marked as "Is Inventoried," it means that the attribute is included in the inventory process and is being synchronized with EmpowerID. This ensures that the attribute's data is updated and maintained within the EmpowerID system. If you do it this way, then the whole thing becomes completely dynamic, and you don’t have to write any code in your connector.
- Repeat the step 34 for these fields as well.
| Select Existing Attribute | Object Type | Select RBAC Object | RBACOBJECT Attribute | Is Inventoried | Action |
|---|---|---|---|---|---|
| LastName | user: user | Account | FirstName | ✔️ Checkmark | Click on the Save button |
| user: user | Account | ✔️ Checkmark | Click on the Save button | ||
| EmployeeID | user: user | Account | FirstName | ✔️ Checkmark | Click on the Save button |
| LogonName | user: user | Account | LogonName | ✔️ Checkmark | Click on the Save button |
- While in the Security Boundary Object Attributes tab, click on the small drop-down arrow next to the search textbox. Then, in the security boundary type dropdown, select AlphaSecurityBoundaryType. Hit Search button. This action will list all the mappings that we have done.
Create Account Store
Registration class
- Open CustomDemoCon in Visual Studio, right-click on the CustomDemoCon project, and go to Add → New Item…
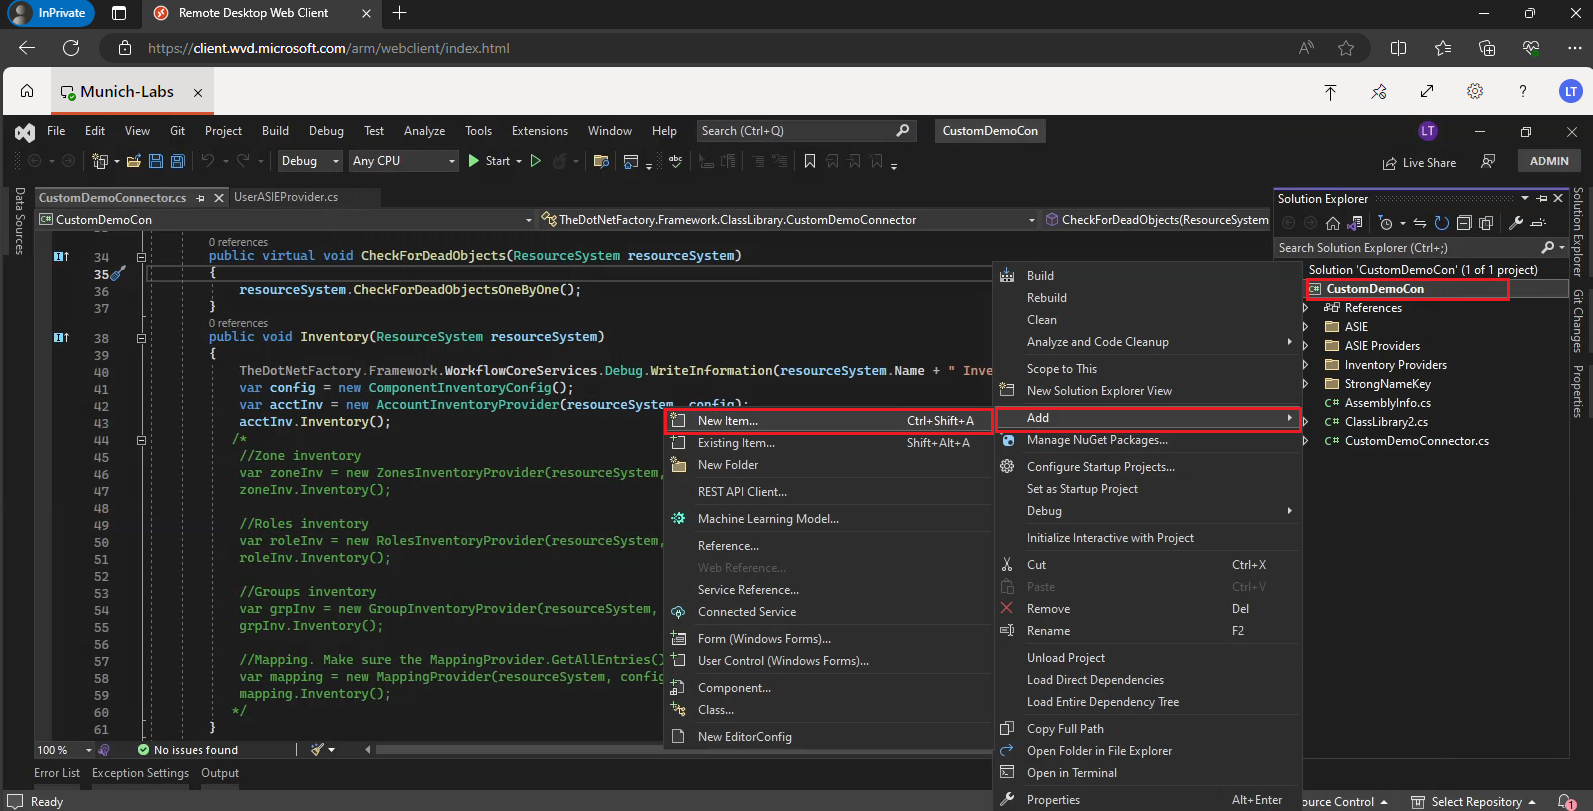
- The Add New Item window will pop up; from it, select Class and give it the name Registration and click on the Add button.
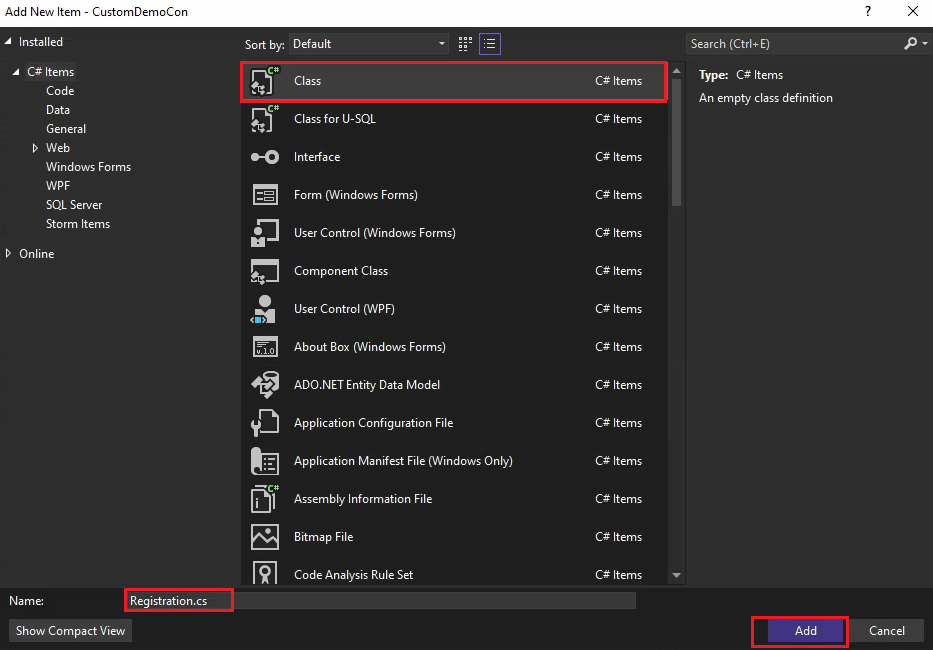
Make sure the access modifier of your Registration class is 'public' and not 'internal,' i.e., 'public class Registration'.

-
In the Registration class, write the code below.
public static C.SecurityBoundary CreateAccountStore(string name)
{
    try
    {
        CustomResourceSystem.ResourceSystemRegistration resourceSystemCreator = new CustomResourceSystem.ResourceSystemRegistration();
        resourceSystemCreator.AccountStoreName = name;
        resourceSystemCreator.DirectoryServerName = name;
        resourceSystemCreator.SecurityBoundaryName = name;
        resourceSystemCreator.SecurityBoundaryTypeName = "AlphaSecurityBoundaryType";
        resourceSystemCreator.ResourceSystemName = name;
        resourceSystemCreator.ResourceSystemTypeName = "AlphaResourceSystemType";
        resourceSystemCreator.Register();

        C.AccountStore store = resourceSystemCreator.RegisteredAccountStore;
        store.AllowProvisioning = false;
        store.AllowDeProvisioning = false;
        store.Update();

        C.ResourceSystem rs = resourceSystemCreator.RegisteredResourceSystem;
        rs.MembershipIsEnabled = false;
        rs.Update();

        //Check your SecurityBoundaryTypeID and pass it in the argument below. In my case, it was 1003.
        C.SecurityBoundary sb = C.SecurityBoundary.GetByFQNSecurityBoundaryTypeID(name, 1003);
        if (sb == null)
        {
            throw new Exception("Failed to create SecurityBoundary for AlphaResourceSystemType system " + name);
        }
        if (C.AccountStore.GetByFQNSecurityBoundaryID(name, sb.SecurityBoundaryID) == null)
        {
            throw new Exception("Failed to create AccountStore for CustomDemoCon system " + name);
        }

        E.TList<ResourceSystemConfigSetting> settings = new E.TList<ResourceSystemConfigSetting>();

        //Using the code below, you can configure parameters on your ResourceSystem. This way, you can make your ConnectionString, StoredProcedure Name, etc., dynamic.
        AddSettingToSystem(rs, "LoginUrl", "https://account-a.AlphaCustomDemoCon.com", settings);

        //AddSettingToSystem(rs, "ApiEndPoint", "/restapi/v2.1/", settings);

        E.TList<ResourceSystemConfigSetting> existingSettings = ResourceSystemConfigSetting.GetByResourceSystemID(rs.ResourceSystemID);
        if (settings != null && settings.Count > 0)
        {
            if (existingSettings != null && existingSettings.Count > 0)
            {
                E.TList<ResourceSystemConfigSetting> settingsToUpdate = new E.TList<ResourceSystemConfigSetting>();
                settingsToUpdate = settings.Where(a => existingSettings.Any(b => b.Name == a.Name)).ToTList<ResourceSystemConfigSetting>();
                settings = settings.Except(settingsToUpdate).ToTList<ResourceSystemConfigSetting>();

                if (settingsToUpdate != null && settingsToUpdate.Count > 0)
                {
                    ResourceSystemConfigSetting.Update(settingsToUpdate);
                }
            }
            ResourceSystemConfigSetting.Insert(settings);
        }
        var typeID = rs.ResourceSystemTypeIDSource.RemoteWCFComponentID;

        return sb;
    }
    catch (Exception ex)
    {
        TheDotNetFactory.Framework.WorkflowCoreServices.Debug.WriteError("Failed to create Delta account store. Error:" + ex.ToString());
        throw ex;
    }
}
private static void AddSettingToSystem(C.ResourceSystem resourceSystem, string name, string value, E.TList<ResourceSystemConfigSetting> settings)
{
AddSettingToSystem(resourceSystem, name, value, false, settings);
}private static void AddSettingToSystem(C.ResourceSystem resourceSystem, string name, string value, bool isEncrypted, E.TList<ResourceSystemConfigSetting> settings)
{
if (resourceSystem != null)
{
var sett = new C.ResourceSystemConfigSetting
{
ResourceSystemID = resourceSystem.ResourceSystemID,
Name = name,
Value = value,
IsEncrypted = isEncrypted
};
if (settings != null)
{
settings.Add(sett);
}
}
}
Make sure your Registration class has these namespaces included.
using System;
using System.Collections.Generic;
using System.Linq;
using System.Text;
using System.Threading.Tasks;
using System.Collections;
using System.Data;
using System.Runtime.Serialization;
using System.ServiceModel;
using components = TheDotNetFactory.Framework.People.Components;
using entities = TheDotNetFactory.Framework.People.Entities;
using TheDotNetFactory.Framework.People.Components;
using TheDotNetFactory.Framework;
using TheDotNetFactory.Framework.Common;
using C = TheDotNetFactory.Framework.People.Components;
using E = TheDotNetFactory.Framework.People.Entities;
using TheDotNetFactory.Framework.Core.Communication.ComponentModel;
using FrameworkEWFCommon = TheDotNetFactory.Framework.EnterpriseWorkflow.Common;
using uni = TheDotNetFactory.Framework.UniversalWorkflow;
In Step #39, the Security Boundary Type ID is 1003. Make sure you assign the appropriate Security Boundary Type ID.
-
Build the project. Once the build is successful, publish it in the EmpowerID UI as well.
-
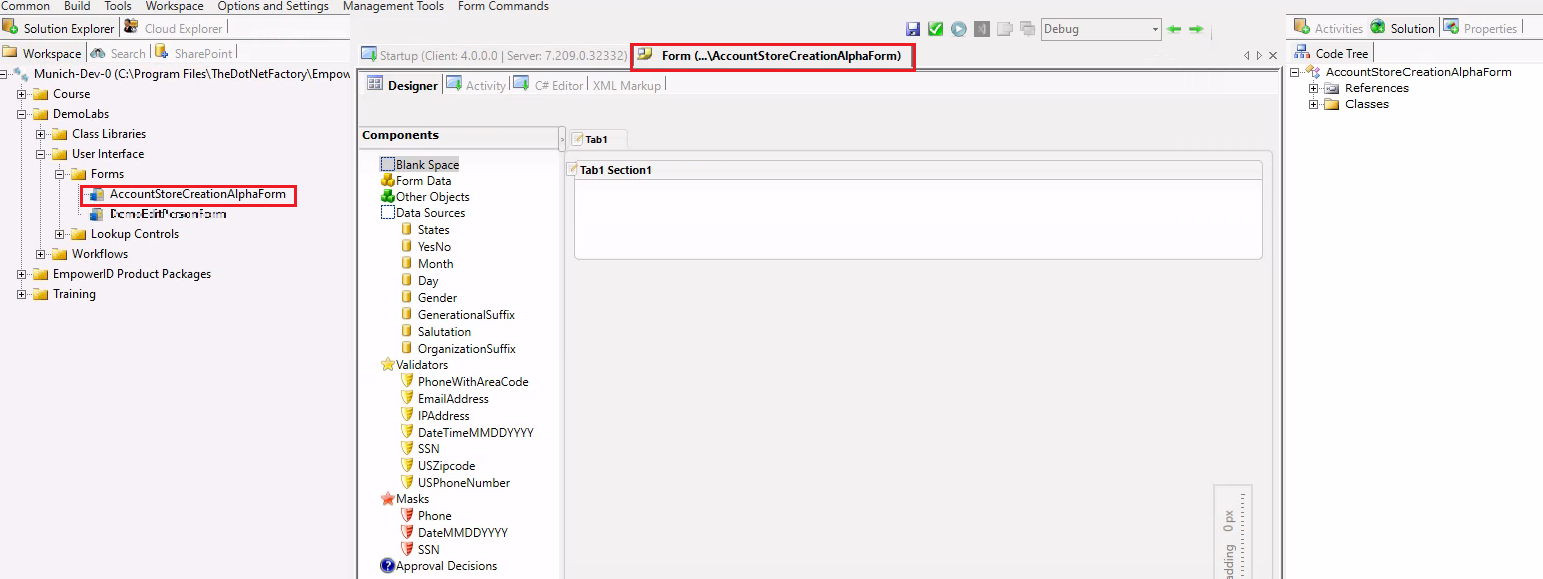
Create a Form and name it AccountStoreCreationAlphaForm and save the Form.
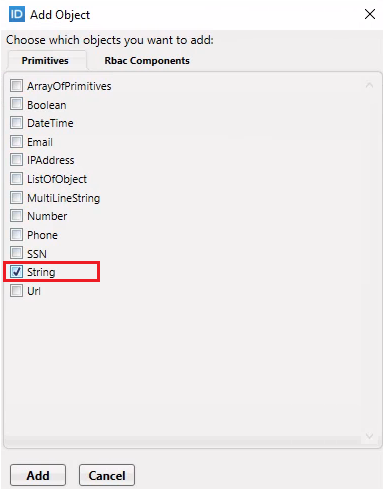
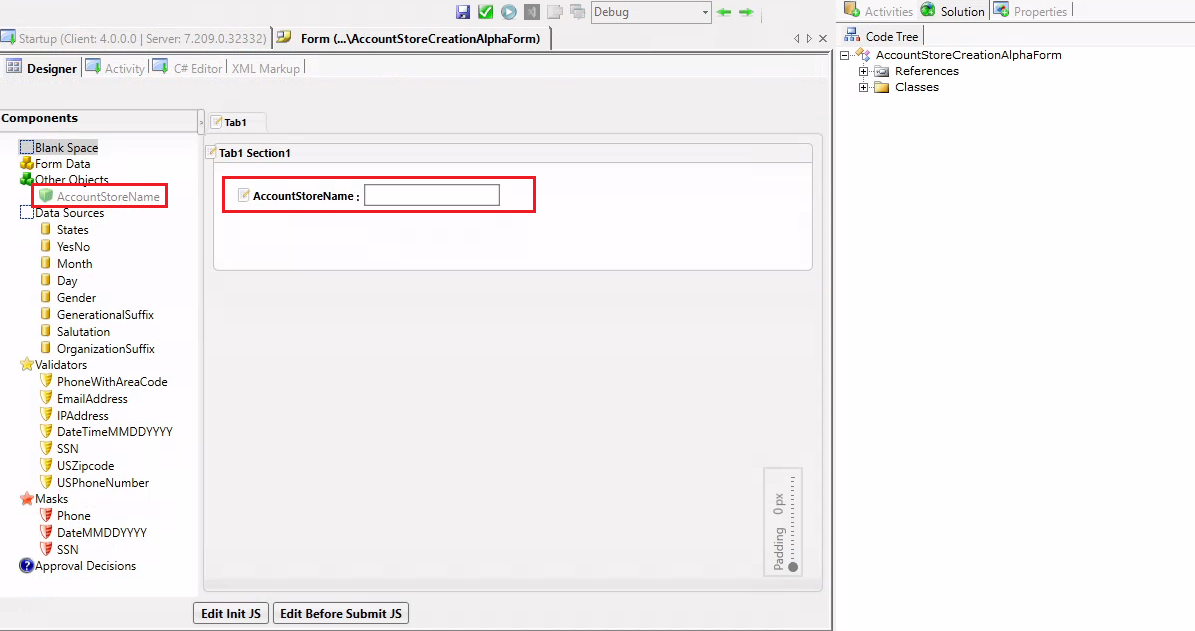
- Add an object of the string type, name it AccountStoreName, and then drag and drop it onto your form.
-
Publish the Form from both Workflow Studio and the EmpowerID UI.
-
Create an activity and save it and give it a name AccountStoreCreationAlphaActivity.
-
Drag the AccountStoreCreationAlphaForm on to your activity.
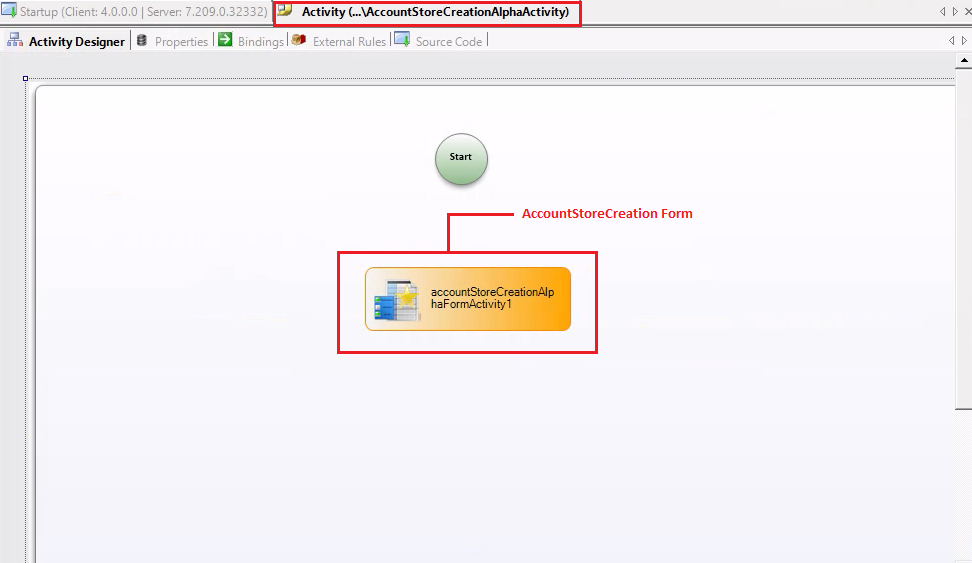
- Drag and drop the system code activity onto the Workflow Designer pane. In the Name property, write InvokeMethod. Then, connect your Form Activity and System Code Activity with a line.

- Select the InvokeMethod activity, then go to the Properties tab. Next, navigate to the Handlers, click on ExecuteCode textbox, write InvokeMethodCode, and hit enter.

- Go to the references and add the reference of your Connector (CustomDemoCon)
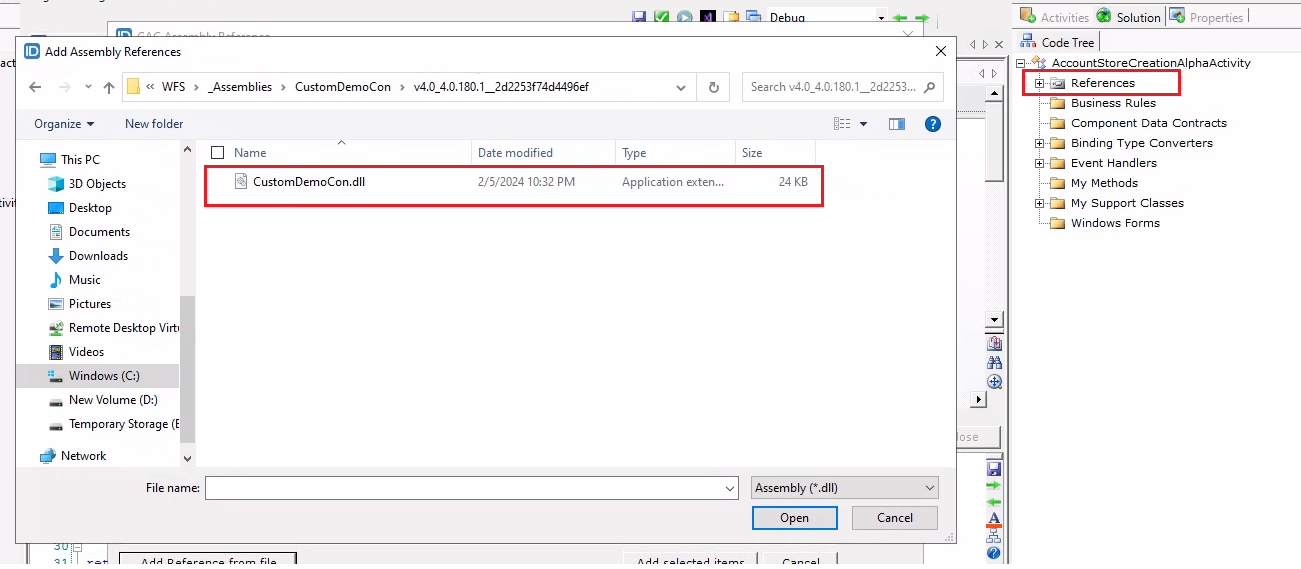
C:\Program Files\TheDotNetFactory\EmpowerID\WFS_Assemblies\CustomDemoCon\v4.0_4.0.180.1__2d2253f74d4496ef.
This is the path from which I retrieved my assembly. The initial path may differ in your case, but it is usually located in the WFS_Assemblies folder:
- In the Implement method of your InvokeMethodCode class write below code
TheDotNetFactory.Framework.ClassLibrary.Registration.CreateAccountStore(this.CurrentWorkflow.accountStoreCreationAlphaFormActivity1.AccountStoreName);
In the above code, we are calling the CreateAccountStore method, which we created in the Registration class of our CustomDemoCon, and passing the AccountStore name (collected on our form) as an input from the user.
-
Publish the activity. Both from Workflow Studio and EmpowerID web.
-
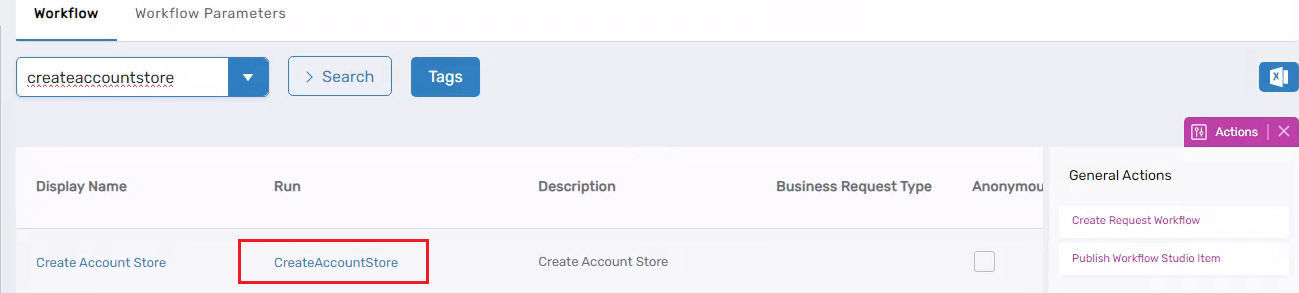
In your Workflow Studio, go to the Search tab next to the Workspace, search for CreateAccountStore, and double-click on it to open it in the workflow designer pane.
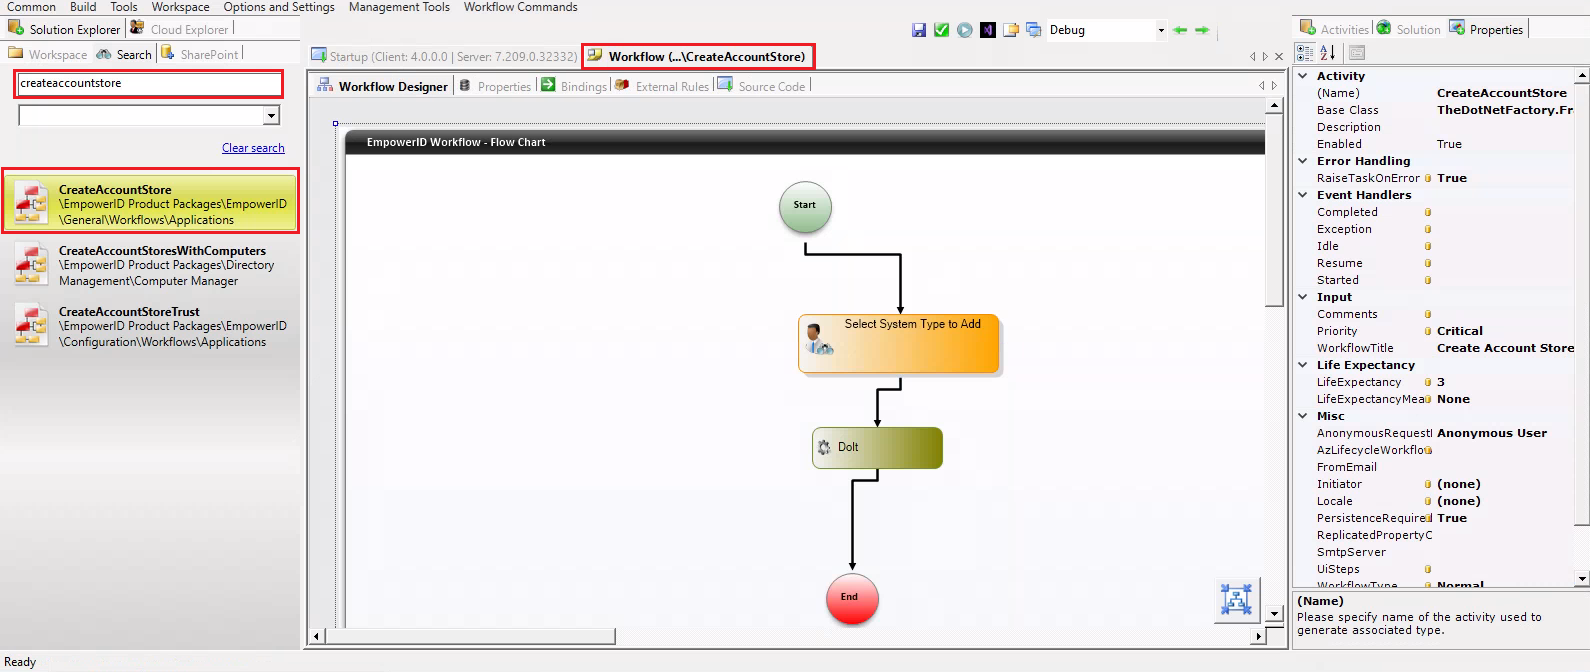
-
Go to the References and add a reference to your activity, AccountStoreCreationAlphaActivity, that we created above.
-
Open the 'Do it activity's ExecuteCode handler by going to the Properties tab, or simply double-click on it to open the execute handler code. Then, go to the Case statements and, at the end, add your case statement as shown below.
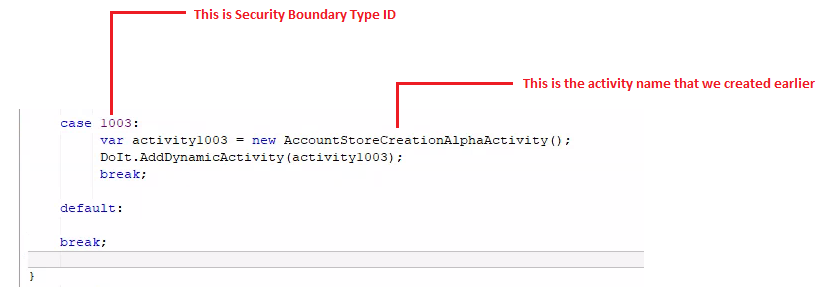
Put your Security Boundary TypeID and your activity's name in the above code. P.S. You can find the Security Boundary TypeID by navigating to your security boundary type in the UI, clicking on the edit button, and there you will be able to see the Security Boundary TypeID.
-
Publish the CreateAccountStore workflow from both Workflow Studio and the EmpowerID UI.
-
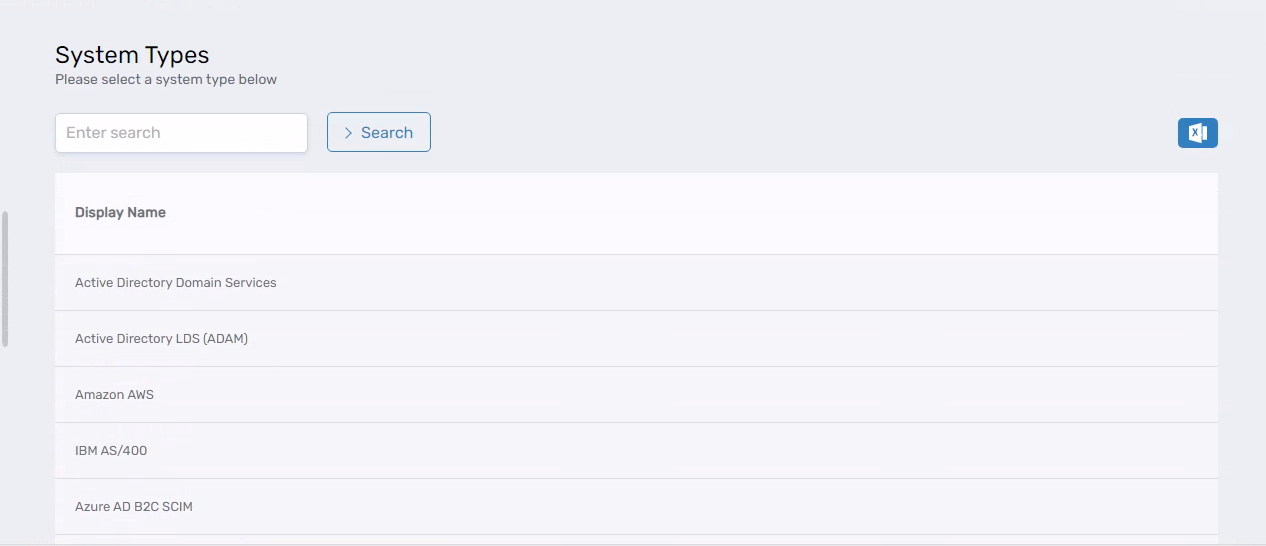
Go to the EmpowerID UI and run the CreateAccountStore Workflow. Click on the Search button, it will list all the System Types. Select your system and hit the Submit button.
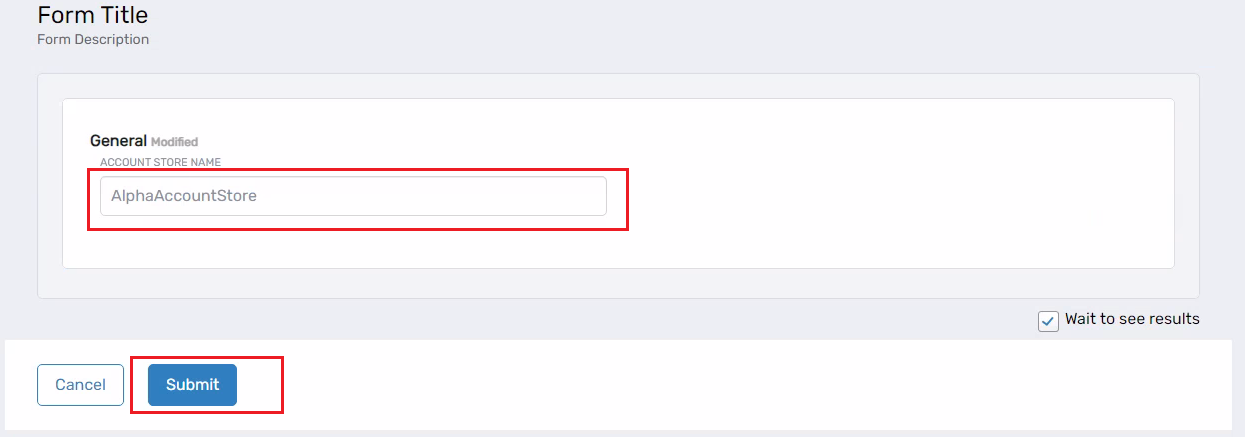
- It will load the form that we created in previous steps. In the Account Store Name textbox, enter the name for your account store, for example, AlphaAccountStore, and then hit the Submit button.
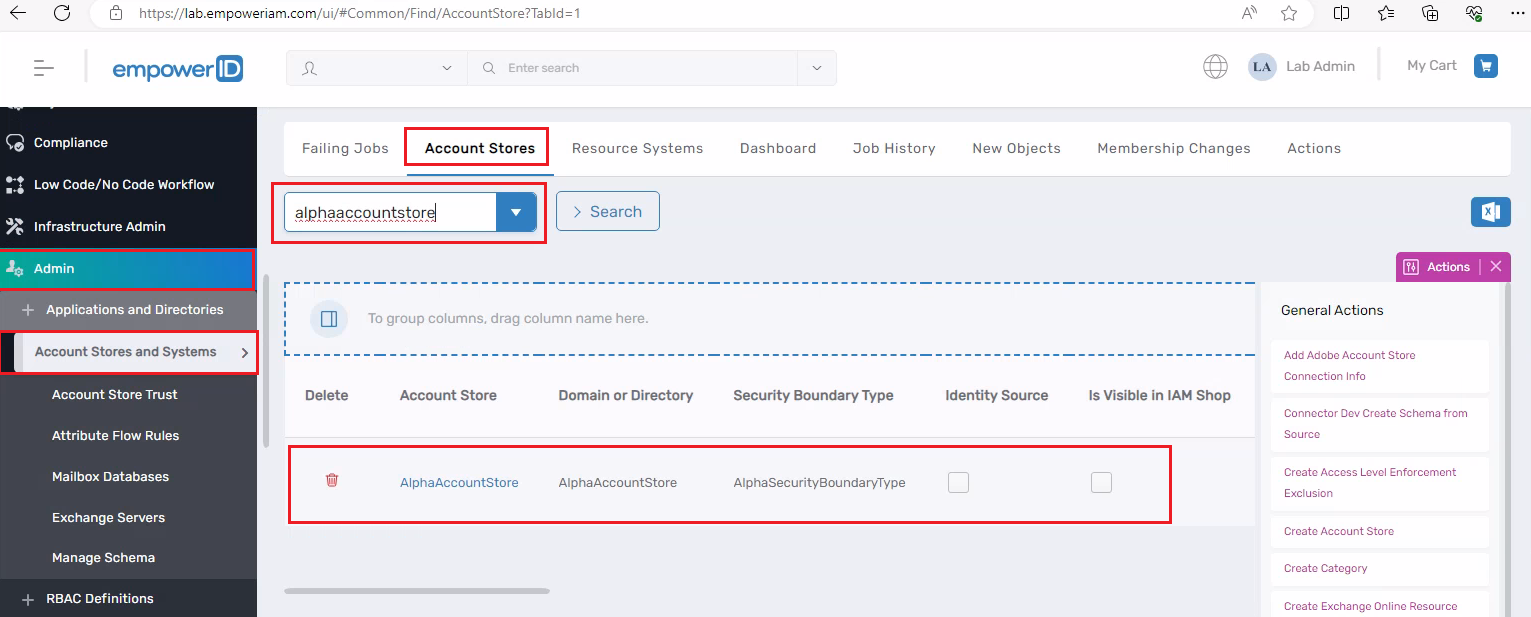
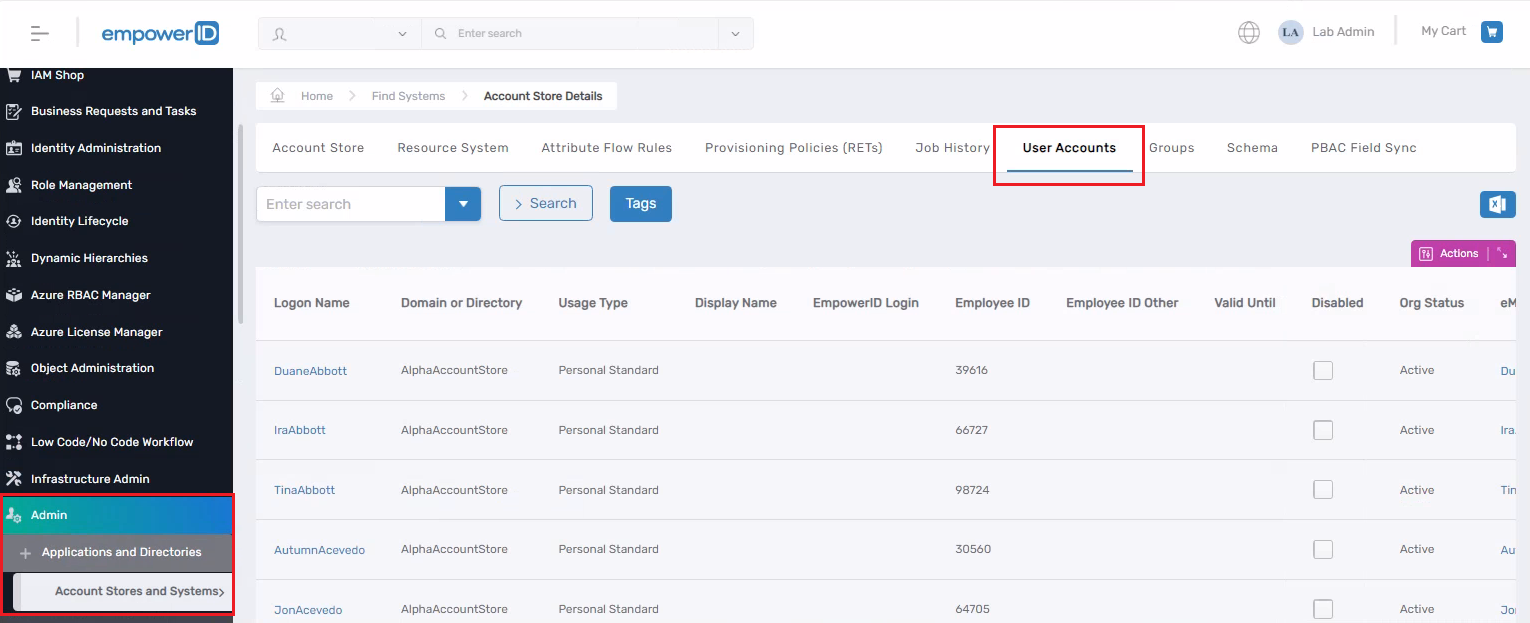
- Go to Admin → Account Stores and Systems, then go to the Account Stores tab, search for AlphaAccountStore, and it will list the account store that we have created.
The steps we have followed to create the account store are primarily intended for when you want to integrate the connector into our product. However, if you are practicing, you do not need to follow all the above steps. Instead, you can take the code from our Registration class, create a Console Application, and place your code there. Running the console app will create the account store for you.

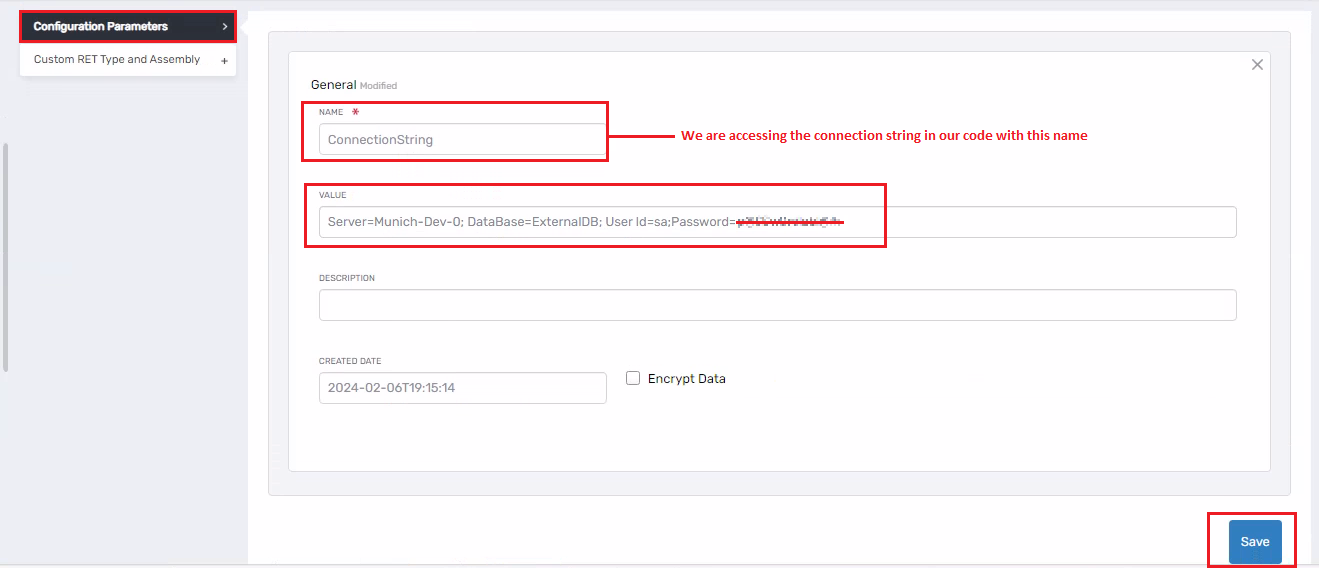
- Click on **AlphaAccountStore, then go to the Resource System tab, scroll down, and there you will see the Configuration Parameters. Click on it.

-
Edit the LoginUrl parameter, which was created by the code we wrote in our Registration class or Console Application.
-
In the Name textbox, write ConnectionString. In the Value field, enter the connection string to connect with your ExternalDB. Click on the Save button.
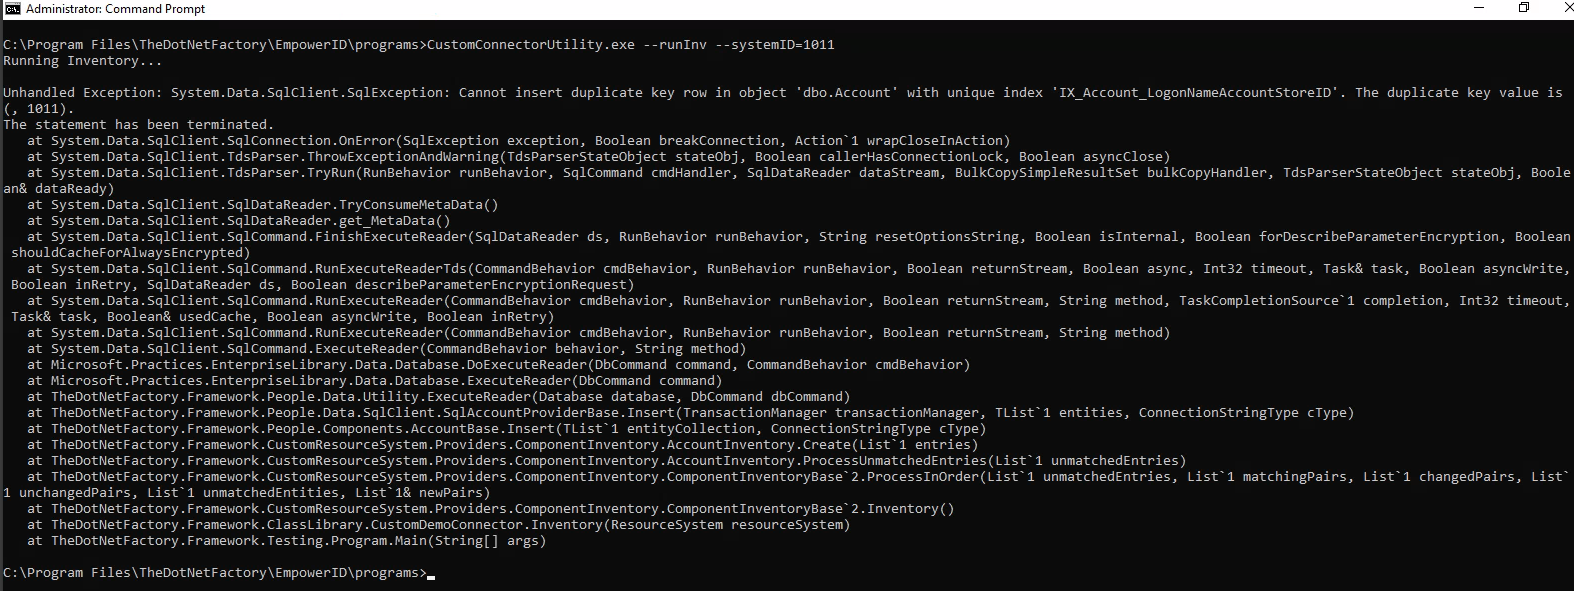
- We have everything ready now let's go ahead and run the connector. To do so, open the Command Prompt and run the CustomConnectorUtility.exe file.
cd Program Files\TheDotNetFactory\EmpowerID\Programs
CustomConnectorUtility.exe --runInv --systemID=1011

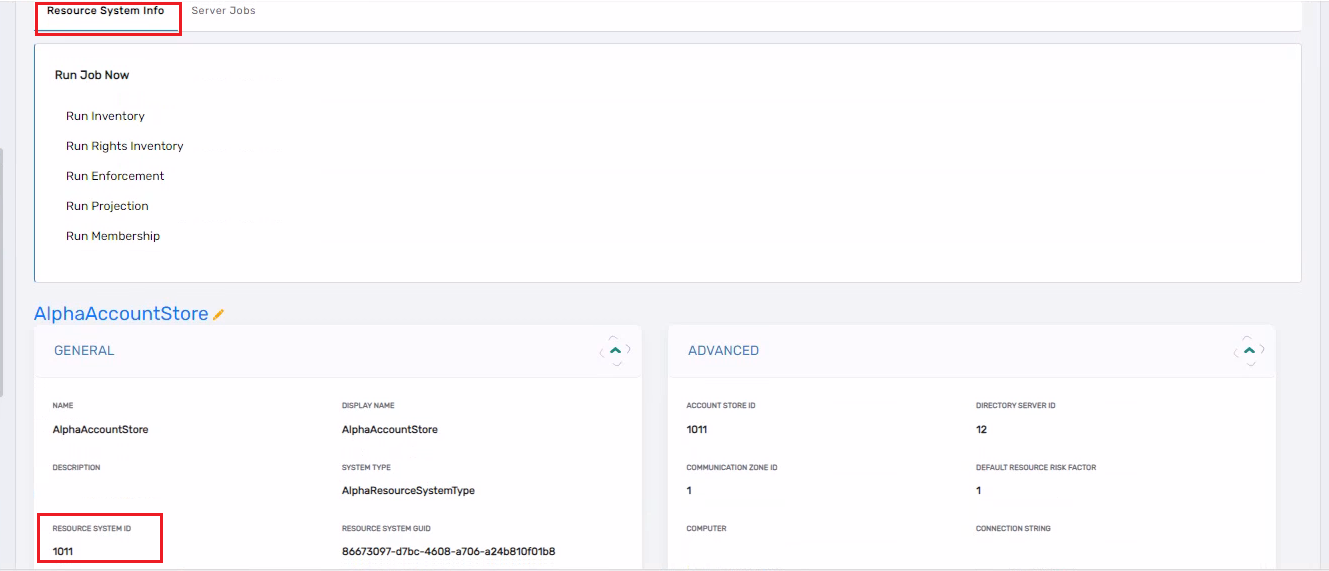
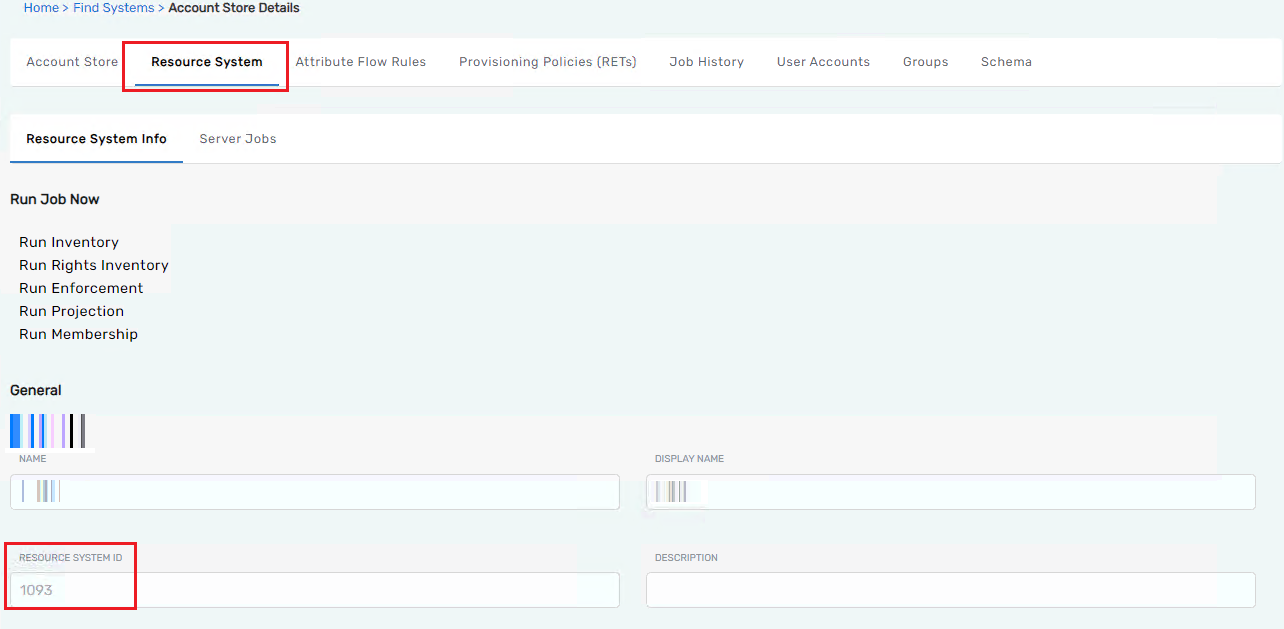
Click on the AlphaAccountStore then go to the Resource System tab under Resource System Info you can find the Resource System ID
- It is giving me below error because in our Account table LogonName field should be unique and mandatory and we are not passing it.
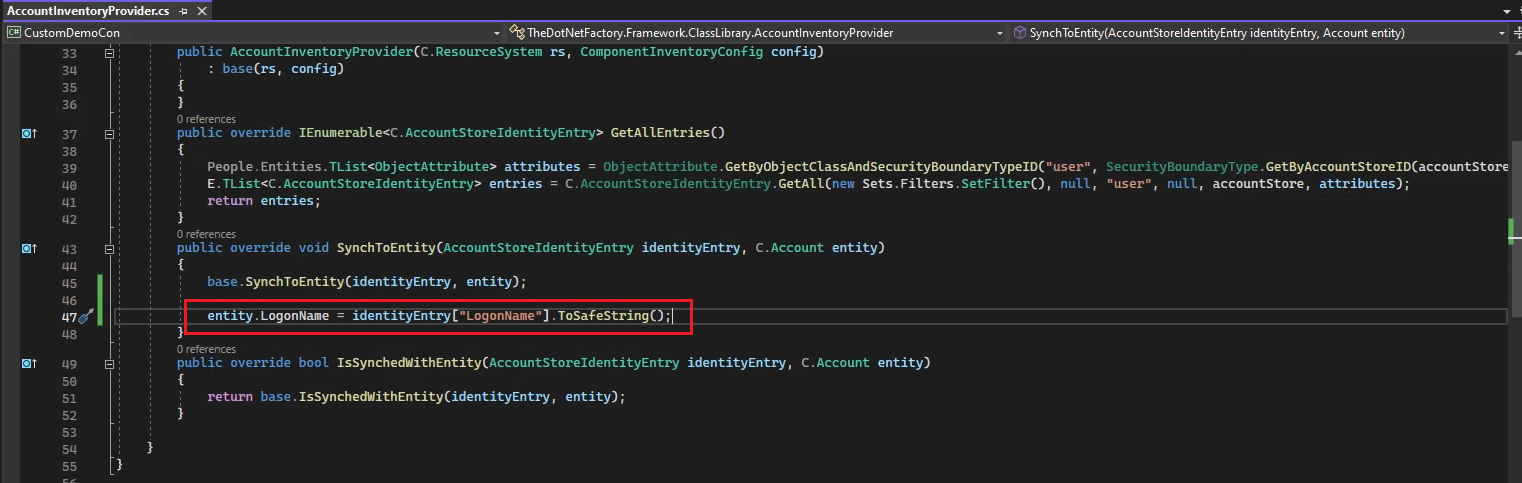
- Open the connector (CustomDemoCon). In the AccountInventoryProvider's class, within the SynchToEntity method, write the code below.
entity.LogonName = identityEntry["LogonName"].ToSafeString();
-
Rebuild the connector, it will publish it. Also publish the connector from the EmpowerID UI.
-
Run the connector again by going to the command prompt.
-
It ran successfully.

- Go to the SQL Server and write the query below to verify whether all the users from the external system have been inventoried.
select FirstName, LastName,Email,LogonName,EmployeeID,* from Account where AccountStoreID = 1011
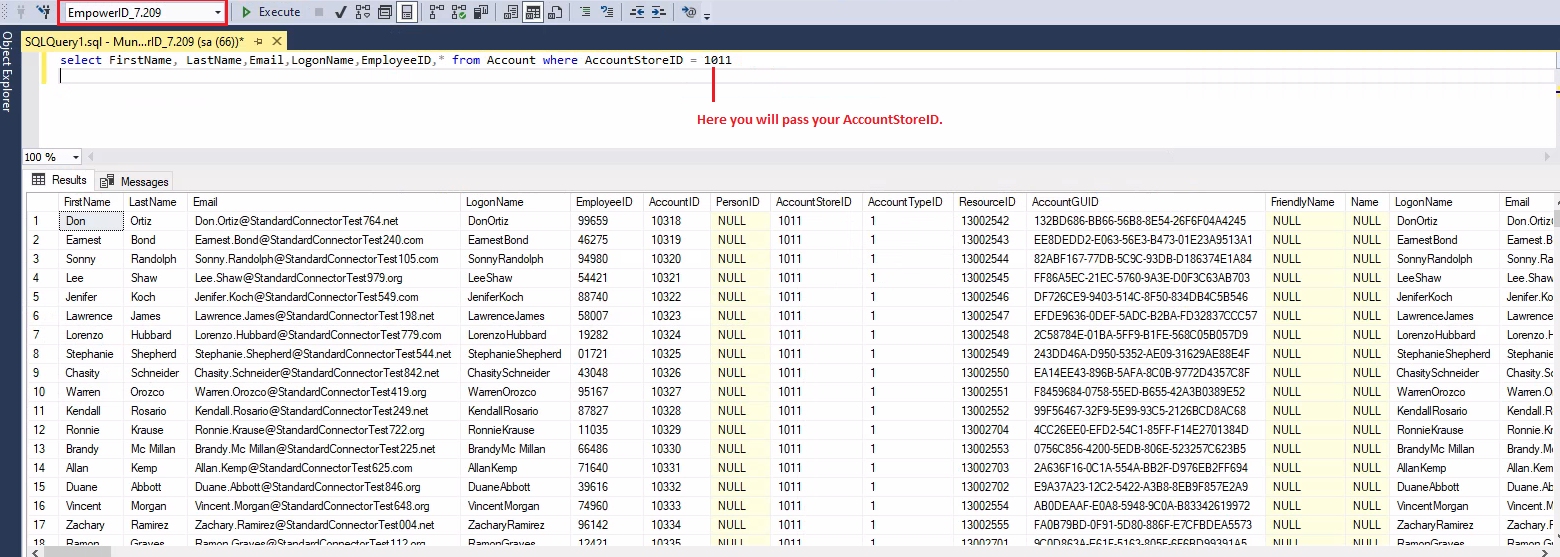
- You can also check by going to the AccountStore and the User Accounts tab.
- We have successfully inventoried the users from the external system and added them to the EmpowerID (Accounts table) using the Custom Connector
Connector Debugging
a - Place a breakpoint in the code where you want to debug.

b - In the command prompt, enter this command and hit Enter.
CustomConnectorUtility.exe --runInv --systemID=1093 -debug

You can find the systemID by going to your Account Store, then navigating to the Resource System tab. Under the Resource System ID, you can see the systemID for your Account Store.
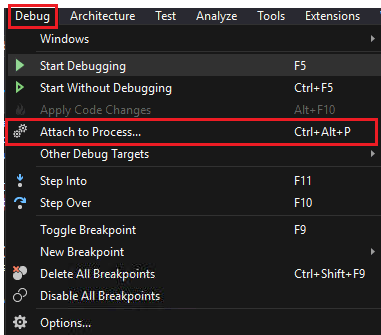
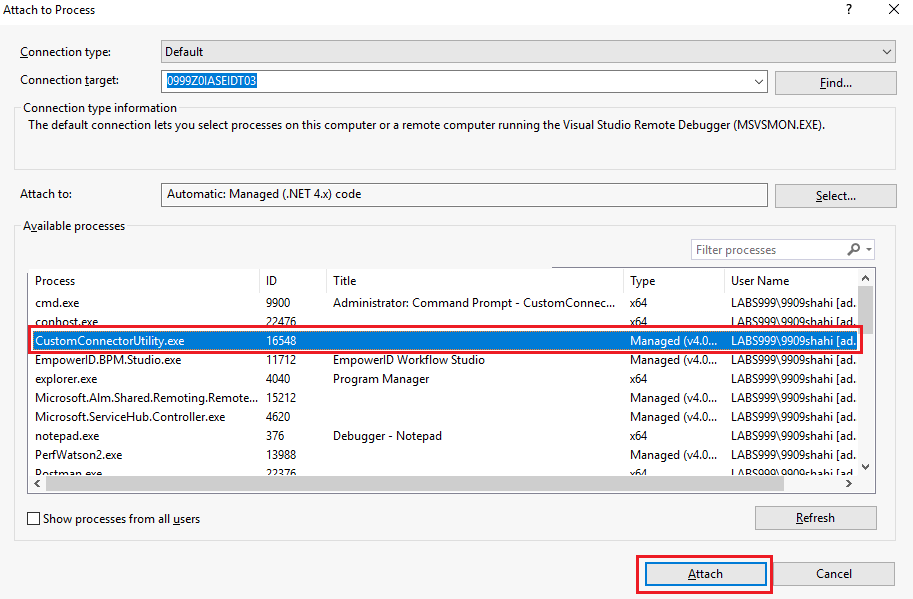
c - Go back to Visual Studio, then navigate to the Debug menu and click on Attach to Process. From the Attach to Process window, select CustomConnectorUtility.exe and click on the Attach button.

d - Go back to the command prompt and press the Enter key or any key to start the Inventorying.


Summarize all the steps
- Prepare the external database.
- Create the template for the custom connector from Workflow Studio.
- Write code in the GetAll method of the UserASIEProvider class.
- Create a stored procedure in the external system to bring in the user data.
- Create a Resource System Type by going to the EmpowerID UI.
- Create a Security Boundary Type by going to the EmpowerID UI.
- Create Security Boundary Attributes by going to the EmpowerID UI.
- Create Security Boundary Object Attributes by going to the EmpowerID UI.
- Create an Account Store.
- Run your connector and test if it successfully brings in the data.